1. Introduction
This document is intended for TASE.2 application developers. It describes the basic principles to use the libtase2 TASE.2/ICCP protocol library to develop client, server, and dual-role applications. For more detailed information please have a look at the API reference manual and the example code.
TASE.2 (or ICCP) is a communication protocol based on MMS and TCP/IP. This protocol library uses MMS, but the user of this library doesn’t need to be familiar with all MMS details in order to use this library. However some basic knowledge of MMS can be helpful, e.g. when debugging applications using wireshark. The library follows an "object-oriented" design. The user handles objects (instances of abstract data types) by using object specific access functions. The implementations of the data structures are hidden. Even when accessible due to C language restrictions the user should not use the data structures directly.
In addition to the native C API the library also provides a C#/.NET API and a Java API. Both APIs are wrappers around the C API and require the native library to be available as a shared object/DLL.
TASE.2/ICCP distinguishes between client and server. The client usually initiates services by sending requests to the server. The server receives the requests and after evaluation initiates some internal processes and sends a response to the client. A TASE.2 application can either be a server, a client, or can even implement both roles at the same time.
In TASE.2 there is a conceptual distinction between operations and actions. Operations are always initiated by client requests while actions are caused by some server internal state changes or external triggers at server side.
The most important data types of the library are
-
Tase2_Endpoint that implements an TASE.2 communication endpoint. The endpoint can be passive (TCP server) or active (TCP client). An endpoint can have one or more dedicated Tase2_Client and at most one dedicated Tase2_Server instance.
-
Tase2_Client that implements the client side to invoke TASE.2 services of a server
-
Tase2_Server that implements the TASE.2 services on top of the MMS protocol library
-
Tase2_DataModel that implements the device model of the TASE.2 server (each Tase2_Server instance has a dedicated Tase2_DataModel instance.
-
Tase2_BilateralTable that specifies the access rights to a servers' data model and services (bilateral table - BLT). A server usually has a dedicated BLT for each associated client.
2. Migration from older versions
2.1. Migration from version 2.0
There are a few places were the API changed and you have to change your code accordingly.
2.1.1. Tase2_Endpoint_Connection object
For the functions Tase2_Endpoint_Connection_getPeerIpAddress and Tase2_Endpoint_Connection_getPeerIpAddress the memory allocation for the returned strings changed.
Prior to version 2.1.0 the strings were allocated when the function was called and had to be released by the caller of the function. Starting from version 2.1.0 the strings are allocated when the function is called the first time and are released when the Tase2_Endpoint_Connection object is destroyed. Usually you get a Tase2_Endpoint_Connection object as an argument of a callback function. It is important not to use any of the functions outside the callback! Otherwise the object might no longer exist and accessing the functions may cause a memory corruption.
When using the .NET or Java API you don’t have to care about this as the it is handled by the API.
2.2. Migration from version 2.1 or older
When you migrate from an older version (prior to version 2.2) it is important to know that the application layer addresses (like AP-title, AE-qualifiers) are checked more rigidly. That means a setup that formerly worked because libtase2 didn’t check all the addressing details might no longer work because libtase2 now checks both the calling and called addresses. This was required when allowing multiple servers on a passive endpoint as the called address is required to identify the correct server instance.
3. General considerations
Usually the data transfer from a server to a client is done by transfer sets. For the measurement and status data data set transfer sets (DSTS) are used. Transfer sets provide a mechanism for automatic data transfer. The client doesn’t have to poll the data points because the server will automatically send new data when a data point changes or on a periodic base.
Data set transfer sets are used to transfer the data of a data set. The data sets can either be predefined by the server or the client can create the data set after connection by online services. The data sets created by online services are called dynamic data sets.
The server provides for each domain a number of DSTSs. These transfer sets can be reserved by the client with the getNextDSTransferSet service. The client can then configure the transfer set parameters (transfer conditions, timeouts, period, …) and then enable the transfer set.
So in general the process can look like below:
-
the client connects to the server
-
the client reserves a transfer set by the getNextDSTransferSet service
-
the client creates a data set with the required indication points and protection equipment data points
-
the client assigns the new data set to the transfer set
-
the client enables the transfer set
-
the server send the data set data to the client on events or periodically
If required a client can use different transfer sets (e.g. if you need different period times for different kind of data).
Data transfer from a client to a server usually consists of sending commands or set points. The receiver of the commands and set points are devices. Devices are part of the server data model.
A TASE.2 application can also be client and server at the same time to use the transfer mechanisms in both directions.
|
Caution
|
Be cautious when using library functions in library callbacks or any code that is called in library callbacks. This can lead to dead lock situations. Don’t use any function that affects a Tase2_Client, Tase2_Server, or Tase2_Endpoint object in a callback. To be safe don’t use any library functions in callbacks. |
4. Supported features
The following features are supported by the library:
-
Indication points
-
Protection equipment
-
Device model (control)
-
Data sets (get/set/create/delete/get directory)
-
DS Transfer Sets (interval, RBE, …)
-
IM Transfer Sets (information messages)
-
Multiple domains
-
Bilateral Tables
-
TLS according to IEC 62351-3/4
-
STASE: application layer authentication (as specified in IEC TS 62351-3:2007)
-
TASE.2 Editions 1996.08, 2000.08
-
Conformance blocks 1, 2, 4, and 5
-
bi-directional(dual-role) active and passive connections
-
passive endpoints can handle multiple server instances
-
C level API to directly use the native library
-
All features are also available in the .NET and Java wrapper APIs
5. Setting up an endpoint instance
For a generic TASE.2 application the first step is to setup and configure a Tase2_Endpoint instance. An endpoint can be a passive (TCP server) or active (TCP client) communication endpoint. An endpoint instance is created by the Tase2_Endpoint_create function. One parameter indicates if the endpoint is passive, the other parameter contains the optional TLS configuration. If no TLS is to be used you should pass a NULL pointer here.
In some cases it is not required to create the Tase2_Endpoint instance manually. In the following two cases the Tase2_Endpoint instance is created automatically:
-
the Tase2_Client is created with the Tase2_Client_create function. This function implicitly creates an active Tase2_Endpoint instance.
-
the Tase2_Server is created with the Tase2_Server_create function. This function implicitly creates a passive Tase2_Endpoint instance.
In library versions prior to 2.0 there where only these two functions to create endpoints and the Tase2_Endpoint class was not available. A client was always connected with a dedicated active endpoint and a server was always connected with a dedicated passive endpoint. Starting from version 2.0 more flexible configurations are possible including configuration that have a Tase2_Client and a Tase2_Server connected with the same endpoint ("dual-role" or "bi-directional" endpoints).
For more flexible setups (e.g. TASE.2 server with active endpoint, TASE.2 client with passive endpoint, or dual-role setups) you have to create the Tase2_Endpoint instance manually.
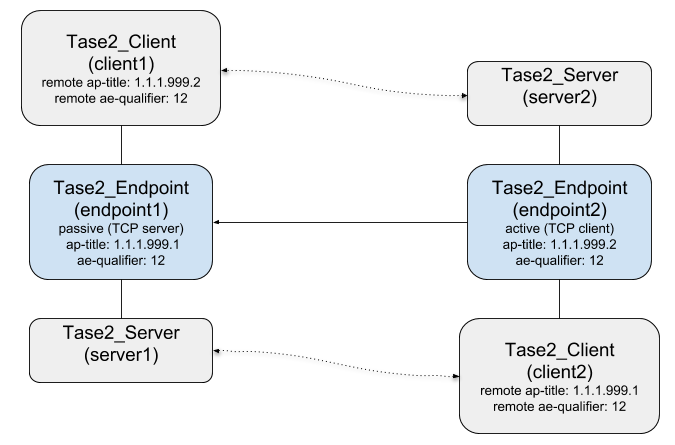
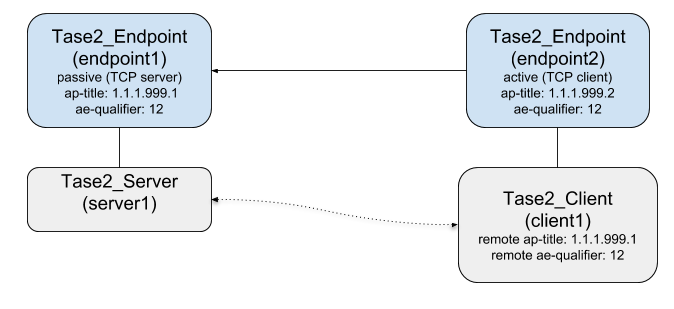
5.1. Configuration of the endpoint
The following code example shows how to create a dual-role passive endpoint. First the Tase2_Endpoint instance will be created and a local application reference will be assigned with the function Tase2_Endpoint_setLocalApTitle.
Then a server is created with the Tase2_Server_createEx function that accepts an Tase2_Endpoint as argument. This function automatically associates the new server instance with the endpoint instance.
After that a client is created with the Tase2_Client_createEx function that also automatically assigns the new client to the endpoint. A remote application reference is assigned to the client with the Tase2_Client_setRemoteApTitle function. Here this means that whenever a remote TASE.2 endpoint connects to the local endpoint it will be connected to this client instance when the remote application reference (or depending on the configuration other addressing parameters) matches with the configured ones of the client.
/* Create a passive endpoint (no TLS) */
Tase2_Endpoint endpoint = Tase2_Endpoint_create(NULL, true);
Tase2_Endpoint_setLocalApTitle(endpoint, "1.1.1.999.1", 12);

/* The single server instance is using the default local AP-title, AE-qualifier of the endpoint */
Tase2_Server server = Tase2_Server_createEx(dataModel, endpoint);

Tase2_Client client = Tase2_Client_createEx(endpoint);
Tase2_Client_setRemoteApTitle(client, "1.1.1.999.2", 12);
When using multiple servers with the same passive endpoint every server has to have its own local application addresses. These can be set using the Tase2_Server_setLocalAddresses function. When this function is not used then the default local address of the server is the address set for the endpoint with Tase2_Endpoint_setLocalApTitle.
It is also possible to remove a client or server during runtime from an endpoint instance using the Tase2_Endpoint_removeServer or Tase2_Endpoint_removeClient functions.
After removing the client or server instances can be released with the Tase2_Server_destroy or Tase2_Client_destroy functions.
It is also possible to move a server instance from one passive endpoint to another passive endpoint:
Tase2_Endpoint_removeServer(passiveEndpoint1, server1);

Tase2_Endpoint_addServer(passiveEndpoint2, server1);|
Note
|
A server can not be added to multiple endpoints at the same time! |
5.2. The addressing parameters used by TASE.2
Next to the TCP/IP layer addresses (IP address and TCP port) there are specific address parameters used by TASE.2/MMS for the upper protocol layer. Actually each protocol layer has its own address.
-
ACSE: application reference (AP-title and AE-qualifier)
-
ISO presentation layer: P selector
-
ISO session layer: S selector
-
ISO transport layer: T selector
Usually the AP-title and AE-qualifier are important. They are used by default by the protocol stack to associate clients with servers. Also they are used to associate bilateral tables to connected clients which is important to implement the access control properly.
The AP-title is an ITU object identifier (OID). It consists of a sequence of numbers separated by dots. The AE-qualifier is a single integer value. You can set these parameters by the setLocalApTitle and setRemoteApTitle functions of Tase2_Endpoint, Tase2_Server, and Tase2_Client.
The lower layer parameters (P, S, T selectors) are usually preset by some common default values and are usually not checked by the library in order to avoid interoperability problems. Yet in some cases (depending on the implementation of the peer device) it might be required to ensure that specific parameters are used.
E.g. you can set the local lower layer parameters by the Tase2_Endpoint_setLocalAddresses function.
You can also change the parameters that are used for address matching (associating connection with client and server instances) by using the Tase2_Endpoint_setAddressMatchingRules function.
5.3. Configuring TLS (optional)
This step is optional and only required for secure (encrypted and/or authenticated) communication.
The TLS configuration represented by a TLSConfiguration object. A new TLS configuration can be created with the TLSConfiguration_create function:
TLSConfiguration tlsConfig = TLSConfiguration_create();
Some validation parameters can be enabled or disabled. In the following example all certificates are accepted that can be validated by one of the installed CA certificates:
TLSConfiguration_setChainValidation(tlsConfig, false);
TLSConfiguration_setAllowOnlyKnownCertificates(tlsConfig, false);
The following function calls are required to load the private key, server certificate, and at least one CA certificate for chain validation:
TLSConfiguration_setOwnKeyFromFile(tlsConfig, "server-key.pem", NULL);
TLSConfiguration_setOwnCertificateFromFile(tlsConfig, "server.cer");
TLSConfiguration_addCACertificateFromFile(tlsConfig, "root.cer");
Starting from version 2.4.0 the TLSConfiguration can be updated for a running endpoint. The update requires to create a new TLSConfiguration instance.
The TLSConfiguration and ALSConfiguration instances now have a reference counter and exist as long as an owner exists (e.g. a running TLS connection). You can freely call TLSConfiguration_destroy in your application when you no longer need it.
5.4. Application layer security/STASE (optional)
Starting from version 2.4.0 Application Layer Security (ALS) is supported according to IEC 62351-3:2007 is supported by the library.
ALS provides application layer authentication during the MMS handshake. Is can only be used for authentication and doesn’t provide encryption. If encryption is required ALS should be combined with TLS.
Similar to TLS the application layer security uses X509 certificates to authenticate peers.
It is possible (and recommended) to combine ALS with TLS.
ALS can be configured at the Endpoint level.
The ALS configuration can be created and used with an Endpoint as in the below code:
ASecurityConfiguration alsConfig = ASecurityConfiguration_create();

Tase2_Endpoint_setALSMode(endpoint, TASE2_ALS_MODE_SECURE);

Crypto_X509Certificate peerCert = Crypto_X509Certificate_create();
Crypto_X509Certificate_addFromFile(peerCert, "client_CA1_3.pem");

Crypto_X509Certificate caCert = Crypto_X509Certificate_create();
Crypto_X509Certificate_addFromFile(caCert, "root_CA1.pem");

Crypto_X509Certificate ownCert = Crypto_X509Certificate_create();
Crypto_X509Certificate_addFromFile(ownCert, "client_CA1_3.pem");

Crypto_PrivateKey ownKey = Crypto_PrivateKey_create();
Crypto_PrivateKey_parseFromFile(ownKey, "client_CA1_3.key");

ASecurityConfiguration_addPeerCertificate(alsConfig, peerCert);
ASecurityConfiguration_setCACertificateChain(alsConfig, caCert);
ASecurityConfiguration_setOwnCertificate(alsConfig, ownCert);
ASecurityConfiguration_setOwnKey(alsConfig, ownKey);

Tase2_Endpoint_setALSConfiguration(endpoint, alsConfig);
Related types are ASecurityConfiguration, Crypto_X509Certificate, Cryptp_PrivateKey.
The Crypte_X509Certificate type can also be used to analyse received certificates in the ConnectionAcceptHandler.
5.5. Starting and stopping the endpoint
The Tase2_Endpoint is started by calling the Tase2_Endpoint_connect function. In case of an active endpoint this will cause the protocol stack to open a TCP connection to a remote TCP server. In case of a passive endpoint this will cause the protocol stack to listen for incoming TCP connections on a local TCP port.
The Tase2_Endpoint_connect function is an asynchronous function. It will invoke the connection process and then will return. After calling the function you can check the current endpoint state by the Tase2_Endpoint_getState function. This will return the current state.
E.g. example in case of an passive endpoint the state will be TASE2_ENDPOINT_STATE_LISTENING when the endpoint is listening for incoming client connections. If there had been a problem the state will be TASE2_ENDPOINT_STATE_ERROR.
In case of an active endpoint the state after calling the Tase2_Endpoint_connect function can either be TASE2_ENDPOINT_STATE_CONNECTING, TASE2_ENDPOINT_STATE_CONNECTED, or TASE2_ENDPOINT_STATE_ERROR.
To simplify programming you can used the Tase2_Endpoint_waitForState. This function will block until a specified state is reached or a time out occured. It will return true if the expected state has been reached or false in case of a time out or error.
The endpoint connections can be closed (and listening to new connection be stopped) with the Tase2_Endpoint_disconnect function.
Tase2_Endpoint_connect(endpoint);

if (Tase2_Endpoint_waitForState(endpoint, TASE2_ENDPOINT_STATE_LISTENING, 1000)) {

	...

	Tase2_Endpoint_disconnect(endpoint);
}
6. Configuring a server instance
A server is represented by a Tase2_Server instance. A server represents a data model, data sets, and transfer sets. In order to setup the server the following steps are required:
-
Create the TASE.2 data model and transfer sets
-
Create the bilateral tables to control the access rights for clients
-
OPTIONAL: Setup the TLS configuration - depending on the setup this has to be done when configuration the Tase2_Endpoint.
-
Create and configure a Tase2_Server instance
6.1. TASE.2 server data model
The server data model is represented by an instance of Tase2_DataModel. The data model consists of domains, indication points, protection equipment data points, devices (control points), data sets, and transfer sets. The data model object can be created by the Tase2_DataModel_create function:
Tase2_DataModel dataModel = Tase2_DataModel_create();
In TASE.2 variables are named objects that are part of the address space of the server. Variables can be system variables (like "Bilateral_Table_ID", "Supported_Features", …), indication points, protections equipment, and devices.
Variables can have two "scopes". The VCC scope or domain specific (ICC) scope. Variables of VCC scope are not part of any TASE.2 domain and are visible to all clients.
Variables of VCC scope are identified by the variable name only. Variables of domain scope are identified by the domain name and the variable name.
A TASE.2 domain is represented by a Tase2_Domain object. The domain object can hold all kind of data points, data sets, and transfer sets. To create a new domain with a specific domain name the Tase2_DataModel_addDomain function has to be used:
Tase2_Domain icc1 = Tase2_DataModel_addDomain(dataModel, "icc1");
The new domain will be added to the data model. The return value is a reference to the newly created domain. It should be stored for further usage.
Despite of the fact that VCC specific variables are not part of a domain, for implementation purposes they are associated with a specific Tase2_Domain instance. This instance is part of the Tase2_DataModel object by default and can be accessed by the Tase2_DataModel_getVCC function.
Tase2_Domain vcc = Tase2_DataModel_getVCC(dataModel);
This function returns a Tase2_Domain instance that represents the VCC.
Now data points can be added to the domains and the VCC "domain" with the Tase2_Domain_addIndicationPoint, Tase2_Domain_addControlPoint, and Tase2_Domain_addProtectionEquipment functions.
|
Note
|
Data point (or variable) names can only consist of alphanumeric ASCII characters (a-z, A-Z, 0-9) and the underscore ("_") sign. All other characters are not allowed an can cause problems during operation. The suffixes "_SBO" and "_TAG" are also not allowed as data point names (for indication points, devices, or protection equipment) as these suffixes are reserved for protocol internal variables! |
6.1.1. Setting the TASE.2 version
It is sometime required To explicitly set the TASE.2 version used by the server. This can be done with the function Tase2_DataModel_setEdition with one of the values of the Tase2_Edition enumeration.
Tase2_DataModel_setEdition(dataModel, TASE2_EDITION_1996_08)
The above function call sets the TASE.2 version for the data model to the version 1996.08 of the standard. The default version is 2000.08.
The TASE.2 version can be set individually for each Tase2_DataModel instance and is used by the Tase2_Server using the data model.
6.1.2. Adding indication points
TASE.2 supports different types of indication points. The simplest version are simple state (e.g. on/off), discrete (integer), or float (real) values. Optionally an indication point can have
-
a quality field that consists of up to eight quality flags
-
a time stamp (normal or extend) field that can represent seconds or milliseconds timestamps
-
a COV (counter of value changes) field
The following basic types are supported:
-
State (TASE2_IND_POINT_TYPE_STATE)
-
State supplemental (TASE2_IND_POINT_TYPE_STATE_SUPPLEMENTAL)
-
Discrete (TASE2_IND_POINT_TYPE_DISCRETE)
-
Real (TASE2_IND_POINT_TYPE_REAL)
Example (adding new variable with name "Real1" to the domain "icc1"):
Tase2_Domain_addIndicationPoint(icc1, "Real1", TASE2_IND_POINT_TYPE_REAL, TASE2_NO_QUALITY, TASE2_NO_TIMESTAMP, false, true);
6.1.3. Adding protection equipment
Protection equipment data points are special data points that are related to protection events (like start or trip). They have one (class = single) or more (class = packed) state values, some flags, an event time, and a duration time.
To add protection equipment data points to the data model you need to use the Tase2_Domain_addProtectionEquipment.
Example:
Tase2_Domain_addProtectionEquipment(icc1, "Protect1", false);
6.1.4. Adding device models (control points)
There are three different types of control points:
-
Commands (TASE2_CONTROL_TYPE_COMMAND)
-
Discrete setpoints (TASE2_CONTROL_TYPE_SETPOINT_DESCRETE)
-
Real setpoints (TASE2_CONTROL_TYPE_SETPOINT_REAL)
Also there are two control classes:
-
Select-before-operate (TASE2_DEVICE_CLASS_SBO). In this mode, first the client has to send a "select" message to "arm" the control point. When selected the client has to send an "operate" message before the select timeout.
-
Direct (TASE2_DEVICE_CLASS_DIRECT). In this mode, the control consists of sending a simple "operate" command.
Example:
Tase2_Domain_addControlPoint(icc1, "Command1", TASE2_CONTROL_TYPE_COMMAND, TASE2_DEVICE_CLASS_SBO, true, 1365);
6.1.5. Adding data sets and data set transfer sets
Data sets are list of variables (system variables and data points) that can be read or written with a single read or write request by the client. They are also the base for DS transfer sets.
A data set can contain the following system variables (of domain scope):
| Name | Description |
|---|---|
Transfer_Set_Name |
The name of the associated transfer set (consists of domain name and transfer set name) |
DSConditions_Detected |
Conditions that caused the transfer set report |
Event_Code_Detected |
The event code of the report |
Transfer_Set_Time_Stamp |
The transfer set timestamp in seconds since epoch |
Tase2_DataSet ds1 = Tase2_Domain_addDataSet(icc1, "ds1");

Tase2_DataSet_addEntry(ds1, icc1, "Transfer_Set_Name");
Tase2_DataSet_addEntry(ds1, icc1, "DSConditions_Detected");
Tase2_DataSet_addEntry(ds1, icc1, "Event_Code_Detected");
Tase2_DataSet_addEntry(ds1, icc1, "Transfer_Set_Time_Stamp");
Tase2_DataSet_addEntry(ds1, vcc, "VCCDiscrete1");
Tase2_DataSet_addEntry(ds1, icc1, "Discrete1");
Tase2_DataSet_addEntry(ds1, icc1, "Discrete2");
Tase2_DataSet_addEntry(ds1, icc1, "DiscreteQTimeTag4");
Adding a new transfer set is simple:
Tase2_Domain_addDSTransferSet(icc1, "DSTrans1");
This command will add a new DS transfer set with the name "DSTrans1" to the domain "icc1".
6.2. Information messages
The concept of information messages consists of the information message (IM) transfer set and information message buffers.
The information message transfer set is an association specific mechanism that (when enabled by the client) sends information messages from the server to the client. The message transmission is triggered by the server. Information messages can be VCC or ICC specific.
Information messages can contain textual messages or arbitrary binary data. The length of information messages is limited by the available information buffers and the maximum MMS PDU size.
To use information messages in a server application first the information buffers have to be created (when creating the server data model).
The information messages will only be sent to a client when the bilateral table allows it. With the bilateral table the information messages are restricted by their parameters information refererence, local reference, and scope (ICC or VCC).
After starting the server information messages can be sent with the Tase2_Server_sendInformationMessage function.
    Tase2_Domain_addInformationMessageObject(icc1, 64);
    Tase2_Domain_addInformationMessageObject(icc1, 1024);

    /* Add information message objects to bilateral table */
    Tase2_BilateralTable_addInformationMessage(blt2, 1, 1, true);
    Tase2_BilateralTable_addInformationMessage(blt2, 2, 2, false);


    /* send information messages */

    char* testMessage = "test message";
    Tase2_Server_sendInformationMessage(server, NULL, 1, 1, msgId, strlen(testMessage), (uint8_t*) testMessage);

    char* testMessage2 = "test message for ICC1";
    Tase2_Server_sendInformationMessage(server, icc1, 2, 2, msgId, strlen(testMessage2), (uint8_t*) testMessage2);
6.3. Bilateral tables
The bilateral table (BLT) consists of the following elements:
-
the bilateral table ID is a unique string to identify the BLT.
-
the application reference of the client (ap-title and ae-qualifier)
-
a specific TASE.2 domain. The client can access all objects of the domain without restrictions.
-
a list of data point access control specifications. If a VCC scope data point is not part of this list it is not accessible by the associated client.
The bilateral tables form an important part of the access control mechanism. If no BLTs are defined, the access control decisions are solely based on the access rights defined for the data point. These access rights are the same for all clients. If bilateral tables are defined the access control decisions are based on both, the access rights defined for the data point and those defined in the bilateral table for the requesting client. If a data point is not part of the bilateral table for the requesting client, the request will be denied and an "object-access-denied" response will be sent to the client. If a data point is specified in the BLT for a client, then the access will only be allowed if it is allowed in the access control specification of the data point and the access control specification in the BLT.
6.4. Setting up the server instance
A server will be represented by a Tase2_Server instance. First the server instance has to be created with the Tase2_Server_create function. The first argument is the data model that has to be created before. The second argument is the TLSConfiguration instance or NULL for insecure connections.
Tase2_Server server = Tase2_Server_create(dataModel, NULL);
In order to apply different access control restrictions for different clients the bilateral tables have to be registered at the server:
Tase2_Server_addBilateralTable(server, blt1);
Tase2_Server_addBilateralTable(server, blt2);
Also the callback handlers can be installed here when required. The following example shows how the handler for write accesses can be registered. All handler registration functions have a third argument that can be used to pass an arbitrary pointer to the callback function. If not required this argument can be set to NULL.
Tase2_Server_setWriteDataHandler(server, writeDataHandler, NULL);
6.5. Starting and running the server
The server can be started with the Tase2_Server_start function:
Tase2_Server_start(server);
Once running the server can call the application by using callback functions.
In case you have configured the Tase2_Endpoint manually you should use the Tase2_Endpoint_connect function. This automatically starts all associated client and server instances:
Tase2_Endpoint_connect(endpoint);
7. Interaction between the application and the server instance
To interact with the server instance the user can use API functions to update data points or register callback functions to handle server events (like read and write accesses by client, device operations, …).
7.1. Update data point values
To update the values the data point manipulations functions should be used:
1.) The value has to be updated
Tase2_IndicationPoint_setDiscrete(icc1Discrete2, 101);
2.) Then the server has to be informed that the value changed:
Tase2_Server_updateOnlineValue(server, (Tase2_DataPoint) icc1Discrete2);
7.2. Server handling of client requests
This section describes how the server handles events. Depending on the kind of callback handlers installed the server will involve the application to handle the request or will handle the request autonomously.
Read requests from clients are handled automatically by the protocol stack. If the server accepts read requests depends on the type of information requested and the access rights that are defined in the bilateral table (BLT).
Write requests will can be handled automatically. In any case the server accepts only write requests that are permitted by the bilateral table. Additionally the user can provide the Tase2_WriteDataHandler that is invoked after the BLT rules are checked and allow write access.
There are also special write requests for devices that are handled by specialized callback handlers (Tase2_SelectHandler, Tase2_OperateHandler, Tase2_SetTagHandler).
7.3. Callback handlers for events
The following callback functions are supported:
-
Tase2_SelectHandler will be called when a select request for a device is received
-
Tase2_OperateHandler will be called when a operate command for a device is received
-
Tase2_SetTagHandler will be called when a set tag request for a device is received
-
Tase2_WriteDataHandler will be called when a write request is received for a data point
7.3.1. Handling of association requests
When an active endpoint opens a connection it send an association request to provide identity information and negotiate some basic connection parameters (like the maximum MMS PDU size).
7.3.2. Handling of the device model (control points)
Handling the device model can involve three kind of callback handlers. The Tase2_SelectHandler is called when a valid select is received for a control. When the application has no Tase2_SelectHandler installed the request is handled solely based on the ACL (access control list) as specified in the bilateral table for the requesting client.
7.4. Managing device tags locally
Devices (control points) can have a tag attribute. This attribute is optional. Tags indicate that the device (or parts of the device functionality) cannot be used temporarily. One reason can be ongoing maintenance work on associated equipment.
A tag has a value which is one of:
-
TASE2_TAG_NO_TAG indicates that the device is not tagged and can be used normally
-
TASE2_TAG_OPEN_AND_CLOSE_INHIBIT open and close commands are not allowed
-
TASE2_TAG_CLOSE_ONLY_INHIBIT a close is not allowed
-
TASE2_TAG_INVALID Invalid tag. May indicate a software problem
Additionally to the value a tag can also have a text string that can indicate a human readable reason for the tag. E.g. "maintenance work".
Tags can be set locally by using the Tase2_ControlPoint_setTag function or remotly by writing a tag value to the ControlPoint_TAG variable by the MMS protocol. Depending on the access control specfications remote access to the tag can be denied.
8. Client programming
A client is represented by a Tase2_Client instance. A client provides the functions to access the data of a specific server.
In particular a client can:
-
browse the data model of the server
-
read and write indication points and protection equipment
-
send commands, setpoints, and tags to devices
-
read data sets
-
create and delete data sets
-
configure transfer sets
-
enable/disable IM transfer sets
-
enable/disable DS transfer sets
-
receive transfer set reports
8.1. Configuring a client instance
In order to setup a client the following steps are required:
-
create the Tase2_Client instance
-
set the remote application reference (AP-title, AE-qualifier, other address parameters)
-
set callback handlers
8.2. Connect to the server
Depending on the configuration this step has to be done using the Tase2_Endpoint_connect function. When not using the Tase2_Endpoint you have to use the Tase2_Client_connect function to start a TCP client connection to the server.
Tase2_ClientError err = Tase2_Client_connect(client, hostname, apTitle, 12);
The Tase2_Client_connect function waits until the connection is established or an error occured during connection establishment.
You can the the success by evaluating the err return value of the function.
When the client is used on a passive Tase2_Endpoint instance (TCP server) it can also be useful to call Tase2_Client_connect when a connection from the active server has been established. Otherwise the client instance will not request information about the TASE.2 version used by the server. In this case the Tase2_Client_connect function can be called with the hostname and apTitle parameters set to NULL or Tase2_Client_connectEx can be used.
8.3. Read the peer identity
TASE.2 uses the identity service to provide some basic information about the device. The identity consists of the vendor, model, and revision of the device.
The identity service is also often used to implement an application level heartbeat in the case no application data is sent.
The following code shows how to read the identity from the server:
char* peerVendor;
char* peerModel;
char* peerRevision;

Tase2_Client_readPeerIdentity(client, &err, &peerVendor, &peerModel, &peerRevision);

if (err == TASE2_CLIENT_ERROR_OK) {
    printf("Peer identity\n");
    printf("  vendor: %s\n", peerVendor);
    printf("  model: %s\n", peerModel);
    printf("  revision: %s\n", peerRevision);

    free(peerVendor);
    free(peerModel);
    free(peerRevision);
}
else
    printf("Failed to get peer identity (errpr=%d)\n", err);
8.4. Handling data sets
To read a data set from the server you first have to use the Tase2_Client_getDataSet function. The function returns an object of type Tase2_ClientDataSet. This is a handle to access the data set data. Tase2_Client_getDataSet itself does not read the data set from the server. Instead it reads the data set directory from the server and creates and initializes the Tase2_ClientDataSet instance with the information received from the server.
The actual step to read the data set from the server is done by calling the Tase2_ClientDataSet_read function.
You can access the names and values of the data set elements with the Tase2_ClientDataSet_getPointName and Tase2_ClientDataSet_getPointValue functions. The function Tase2_ClientDataSet_getSize provides the number of data set elements.
The following code shows how to access the data set elements:
for (int i = 0; i < Tase2_ClientDataSet_getSize(dataSet); i++) {
    Tase2_PointName pointName = Tase2_ClientDataSet_getPointName(dataSet, i);
    Tase2_PointValue pointValue = Tase2_ClientDataSet_getPointValue(dataSet, i);

    ...
}
The type Tase2_PointName is a pointer to a structure that contains the domain and the variable name of the data point. It is also possible to get these two strings separate by using the Tase2_ClientDataSet_getPointVariableName and Tase2_ClientDataSet_getPointDomainName functions.
There are also a function Tase2_ClientDataSet_isDeletable that returns the information if the data set can be deleted by the client (when it is a dynamic data set).
8.5. Create and delete dynamic data sets
Dynamic data sets can be used by the client to create data sets that contain all information required by the application and do not have to rely that this information is contained in preconfigured data sets.
A dynamic data set can be created by the Tase2_Client_createDataSet function.
To specify the data set a LinkedList object with the data set name strings as elements has to be created first and passed to the function:
The following code shows how to create a dynamic data set:
LinkedList newDataSet = LinkedList_create();

LinkedList_add(newDataSet, "icc1/Discrete1");
LinkedList_add(newDataSet, "icc1/Discrete2");
LinkedList_add(newDataSet, "icc1/Discrete3");

if (Tase2_Client_createDataSet(client, &err, "icc1", "DSR_AUTO_0000", newDataSet) == false)
    printf("Failed to create new data set!\n");

LinkedList_destroyStatic(newDataSet);|
Note
|
On the server side there is a limit of 500 data set entries. If you try to create a data set with more than 500 entries the server will return an error. |
It is recommended not to create large data sets. This can have a negative impact on performance. Also when the data set it too big there is the risk that the data doesn’t fit into a single MMS PDU and then cannot be set. Instead use the multipe data sets/DS transfer sets to transport large amounts of data.
Finally you can delete a data set with the Tase2_Client_deleteDataSet function. E.g.:
bool isDeleted = Tase2_Client_deleteDataSet(client, &err, "icc1", "DSR_AUTO_0000");
8.6. Configuration of data set transfer sets (DSTS)
Data set transfer sets (DSTS) are the most important and most efficient mechanism to transport data from the server to the client. They can be used to send data from the server to the client without the client sending requests.
To start using a DSTS you have to call the Tase2_Client_getNextDSTransferSet with the correct domain name that is assigned to your client by the BLT. This function returns an object of type Tase2_ClientDSTransferSet that is the representation of the allocated transfer set. The transfer set can then be configured by writing to the configuration properties of the transfer set.
First you have to configure the data set for the transfer set (e.g. with the Tase2_ClientDSTransferSet_writeDataSetName function). Then also other important parameters can be configured.
| Name | Description | Access functions |
|---|---|---|
Start Time |
Time value for the TASE.2 server to begin condition monitoring (0 = immediately) |
Tase2_ClientDSTransferSet_writeStartTime, Tase2_ClientDSTransferSet_setStartTime Tase2_ClientDSTransferSet_getStartTime |
Interval |
Time interval between TASE.2 server report (in seconds) |
Tase2_ClientDSTransferSet_writeInterval, Tase2_ClientDSTransferSet_setInterval, Tase2_ClientDSTransferSet_getInterval |
TLE |
Time limit for execution |
Tase2_ClientDSTransferSet_writeTLE, Tase2_ClientDSTransferSet_getTLE, Tase2_ClientDSTransferSet_setTLE |
Buffer Time |
Time interval for buffering object change condition before reporting to the client (in seconds) |
Tase2_ClientDSTransferSet_writeBufferTime, Tase2_ClientDSTransferSet_getBufferTime, Tase2_ClientDSTransferSet_setBufferTime |
Integrity Check |
Value for integrity check timeout in seconds |
Tase2_ClientDSTransferSet_writeIntegrityCheck, Tase2_ClientDSTransferSet_getIntegrityCheck, Tase2_ClientDSTransferSet_setIntegrityCheck |
DSConditions Requested |
Specifies the trigger conditions for reports |
Tase2_ClientDSTransferSet_writeDSConditionsRequested, Tase2_ClientDSTransferSet_setDSConditionsRequested, Tase2_ClientDSTransferSet_getDSConditionsRequested |
Block Data |
activate block transfer report encoding when CB 3 is supported (not supported by library!) |
Tase2_ClientDSTransferSet_writeBlockData, Tase2_ClientDSTransferSet_setBlockData, Tase2_ClientDSTransferSet_getBlockData |
Critical |
Control if report is critical. When true the client has to acknowledge the report |
Tase2_ClientDSTransferSet_writeCritical, Tase2_ClientDSTransferSet_setCritical, Tase2_ClientDSTransferSet_getCritical |
RBE |
Control report by exception mechanism. True means that only the changed objects are reported |
Tase2_ClientDSTransferSet_writeRBE, Tase2_ClientDSTransferSet_setRBE, Tase2_ClientDSTransferSet_getRBE |
All Changes Reported |
Control the number of changes of a given data point that may be reported in a single report. True means that all changes are reported, false means that only the last change is reported. |
Tase2_ClientDSTransferSet_writeAllChangesReported, Tase2_ClientDSTransferSet_setAllChangesReported, Tase2_ClientDSTransferSet_getAllChangesReported |
There are the three important basic reporting options:
-
IntervalTimeout (to send reports with changes periodically)
-
IntegrityTimeout (to send the whole dataset periodically)
-
ObjectChange (to send changes when they happen)
These basic mechanisms can be combined with other options:
-
AllChangesReports (can be used with ObjectChange and IntervalTimeout)
-
RBE (can also be used with ObjectChange and IntervalTimeout)
The following parameters can be used to configure the basic reporting options:
-
Interval is used to configure the IntervalTimeout option. Reporting starts at StartTime and is periodically repeated after each interval timeout.
-
IntegrityCheck is used to configure the IntegrityTimeout option.
-
BufferTime is used to configure the ObjectChange option.
For the option IntervalTimeout there exist the following cases:
-
RBE = false → the current state of all objects is reported when the interval timeout expires
-
RBE = true AND AllChangesReported = false → current state of the changed object is reported when the interval expires and only the final state of the changed object is reported
-
RBE = true AND AllChangesReported = true → current state of the changed object in reported when interval expires and all state changes that happened during the interval are reported.
For ObjectChange the following cases exist:
-
BufferTime = 0 → a report is generated for each change
-
BufferTime > 0 AND RBE = false → current state of all objects is reported when bufferTime expires
-
BufferTime > 0 AND RBE = true AND AllChangesReported = true → only the state of changed objects is reported when bufferTime expires and all object changes that happen during the bufferTime are reported
-
BufferTime > 0 AND RBE = true AND AllChangesReported = false → only the state of changed objects is reported when bufferTime expires and only the latest state for each object is reported
The IntegrityTimeout can be used additionally to send the whole dataset periodically when RBE = true. Otherwise the IntervalTimeout can be used to send the whole dataset periodically.
ts = Tase2_Client_getNextDSTransferSet(client, "icc1", &err);

if (ts) {

    Tase2_ClientDSTransferSet_setDataSet(ts, dataSet);

    printf("DSTransferSet %s:%s\n", Tase2_ClientDSTransferSet_getDomain(ts), Tase2_ClientDSTransferSet_getName(ts));

    Tase2_ClientDSTransferSet_readValues(ts, client);

    printf("  data-set: %s:%s\n", Tase2_ClientDSTransferSet_getDataSetDomain(ts), Tase2_ClientDSTransferSet_getDataSetName(ts));

    if (Tase2_ClientDSTransferSet_writeDataSetName(ts, client, "icc1", "ds1") != TASE2_CLIENT_ERROR_OK)
        printf("Write data set failed!\n");

    if (Tase2_ClientDSTransferSet_writeInterval(ts, client, 1) != TASE2_CLIENT_ERROR_OK)
        printf("Write interval failed!\n");

    if (Tase2_ClientDSTransferSet_writeRBE(ts, client, true) != TASE2_CLIENT_ERROR_OK)
        printf("Write RBE failed!\n");

    if (Tase2_ClientDSTransferSet_writeCritical(ts, client, true) != TASE2_CLIENT_ERROR_OK)
        printf("Write critical failed!\n");

    if (Tase2_ClientDSTransferSet_writeDSConditionsRequested(ts, client, TASE2_DS_CONDITION_INTERVAL | TASE2_DS_CONDITION_CHANGE) != TASE2_CLIENT_ERROR_OK)
        printf("Failed to write DS conditions requested!\n");

    printf("Start DSTransferSet\n");

    if (Tase2_ClientDSTransferSet_writeStatus(ts, client, true) != TASE2_CLIENT_ERROR_OK)
        printf("  failed!\n");

}
8.7. Handling of DSTS reports
DSTS reports are handled by two different callback types. The first callback (Tase2_DSTransferSetReportHandler) is called twice for each report that is received. First when the report was received and the second invocation happens after the last value from the report has been passed to the user. The second callback Tase2_DSTransferSetValueHandler is called for each single value that is part of the report.
static void
dsTransferSetReportHandler(void* parameter, bool finished, uint32_t seq, Tase2_ClientDSTransferSet transferSet)
{
    if (finished) {
        printf("--> (%i) report processing finished\n", seq);
    }
    else {
        printf("New report received with seq no: %u\n", seq);
    }
}static void
dsTransferSetValueHandler(void* parameter, Tase2_ClientDSTransferSet transferSet, const char* domainName, const char* pointName, Tase2_PointValue pointValue)
{
printf(" Received value for %s:%s\n", domainName, pointName);
}8.8. Handling of information messages (IM)
Information message (IM) transfer sets are used to send text or binary messages to one or more client. A client can subscribe to the information messages from a server by using the Tase2_Client_IMTransferSetEnable function. The server will then send all information messages to the client that are specified in the corresponding bilateral table (BLT).
The information messages are handled by a callback function.
static void
imTransferSetHandler (void* parameter, int32_t infoRef, int32_t localRef, int32_t msgId, int32_t size, uint8_t* messageBuffer)
{
    printf("Received information message:\n");
    printf("  infoRef:  %d\n", infoRef);
    printf("  localRef: %d\n", localRef);
    printf("  msgId:    %d\n", msgId);
    printf("  message: (%.*s)\n", size, messageBuffer);
}

...

Tase2_Client_installIMTransferSetHandler(client, imTransferSetHandler, NULL);

Tase2_Client_IMTransferSetEnable(client, &err);

if (err != TASE2_CLIENT_ERROR_OK)
    printf("Failed to enable IM transfer set (error=%d)\n", err);
9. General Information
9.1. Supervisory Control and Data Acquisition Types
| Type name | Value Type | Quality | Timestamp | COV |
|---|---|---|---|---|
Data_Real |
FLOAT32 |
- |
- |
- |
Data_State |
STATE |
Yes (part of state) |
- |
- |
Data_Discrete |
INT32 |
- |
- |
- |
Data_StateSupplemental |
STATE EXTENDED |
- |
- |
- |
Data_RealQ |
FLOAT32 |
Flags |
- |
- |
Data_StateQ |
STATE |
Flags |
- |
- |
Data_DiscreteQ |
INT32 |
Flags |
- |
- |
Data_StateSupplementalQ |
STATE EXTENDED |
Flags |
- |
- |
Data_RealQTimeTag |
FLOAT32 |
Flags |
Timestamp(seconds) |
- |
Data_StateQTimeTag |
STATE |
Yes (part of state) |
Timestamp(seconds) |
- |
Data_DiscreteQTimeTag |
INT32 |
Flags |
Timestamp(seconds) |
- |
Data_StateSupplementalQTimeTag |
STATE EXTENDED |
Flags |
Timestamp(seconds) |
- |
Data_RealExtended |
FLOAT32 |
Flags |
Timestamp(seconds) |
Yes |
Data_StateExtended |
STATE |
Yes (part of state) |
Timestamp(seconds) |
Yes |
Data_DiscreteExtended |
INT32 |
Flags |
Timestamp(seconds) |
Yes |
Data_StateSupplementalExtended |
STATE EXTENDED |
Flags |
Timestamp(seconds) |
Yes |
Data_RealQTimeTagExtended (Edition 2 only) |
FLOAT32 |
Flags |
Timestamp(milliseconds) |
- |
Data_StateQTimeTagExtended (Edition 2 only) |
STATE |
Yes (part of state) |
Timestamp(milliseconds) |
- |
Data_DiscreteQTimeTagExtended (Edition 2 only) |
INT32 |
Flags |
Timestamp(milliseconds) |
- |
Data_StateSupplementalQTimeTagExtended (Edition 2 only) |
STATE EXTENDED |
Flags |
Timestamp(milliseconds) |
- |