IEC 60870-5-101/104 Test Client is an easy to use test tool for testing communication devices or software that implement the IEC 60870-5-101/104 server/slave protocols.
1. Overview
Features:
-
CS 104 (TCP/IP) and CS 101 (serial)
-
Support for sending all standard message types
-
Define and send/receive custom message types
-
Sending commands
-
Analyze message details
-
File upload and download to the device
-
Save recorded telegrams for later analysis
-
Supports TLS encryption
-
Save latest values in an Excel or CSV file
-
…
Software requirements:
-
Windows 7, 8.1, or 10 (32 or 64 bit)
-
.NET Framework 4.7 or later
First you have to download an run the installer. When the installer is finished you should find an entry for the application in the Windows start menu. Click this entry to start the application.
When starting the application for the first time you will be asked to activate the product. Please enter you license code that you should have received by email into the license key text field and press the "Activate Online" button (only when you have an internet connection). When you don’t have an internet connection please follow the steps below in the activation window.
2. The Main Window
The main window is composed of a) the menu at the top b) the main telegram list c) a status bar at the button and d) a quick access bar and e) "Connection" bar at the top of the telegram list.
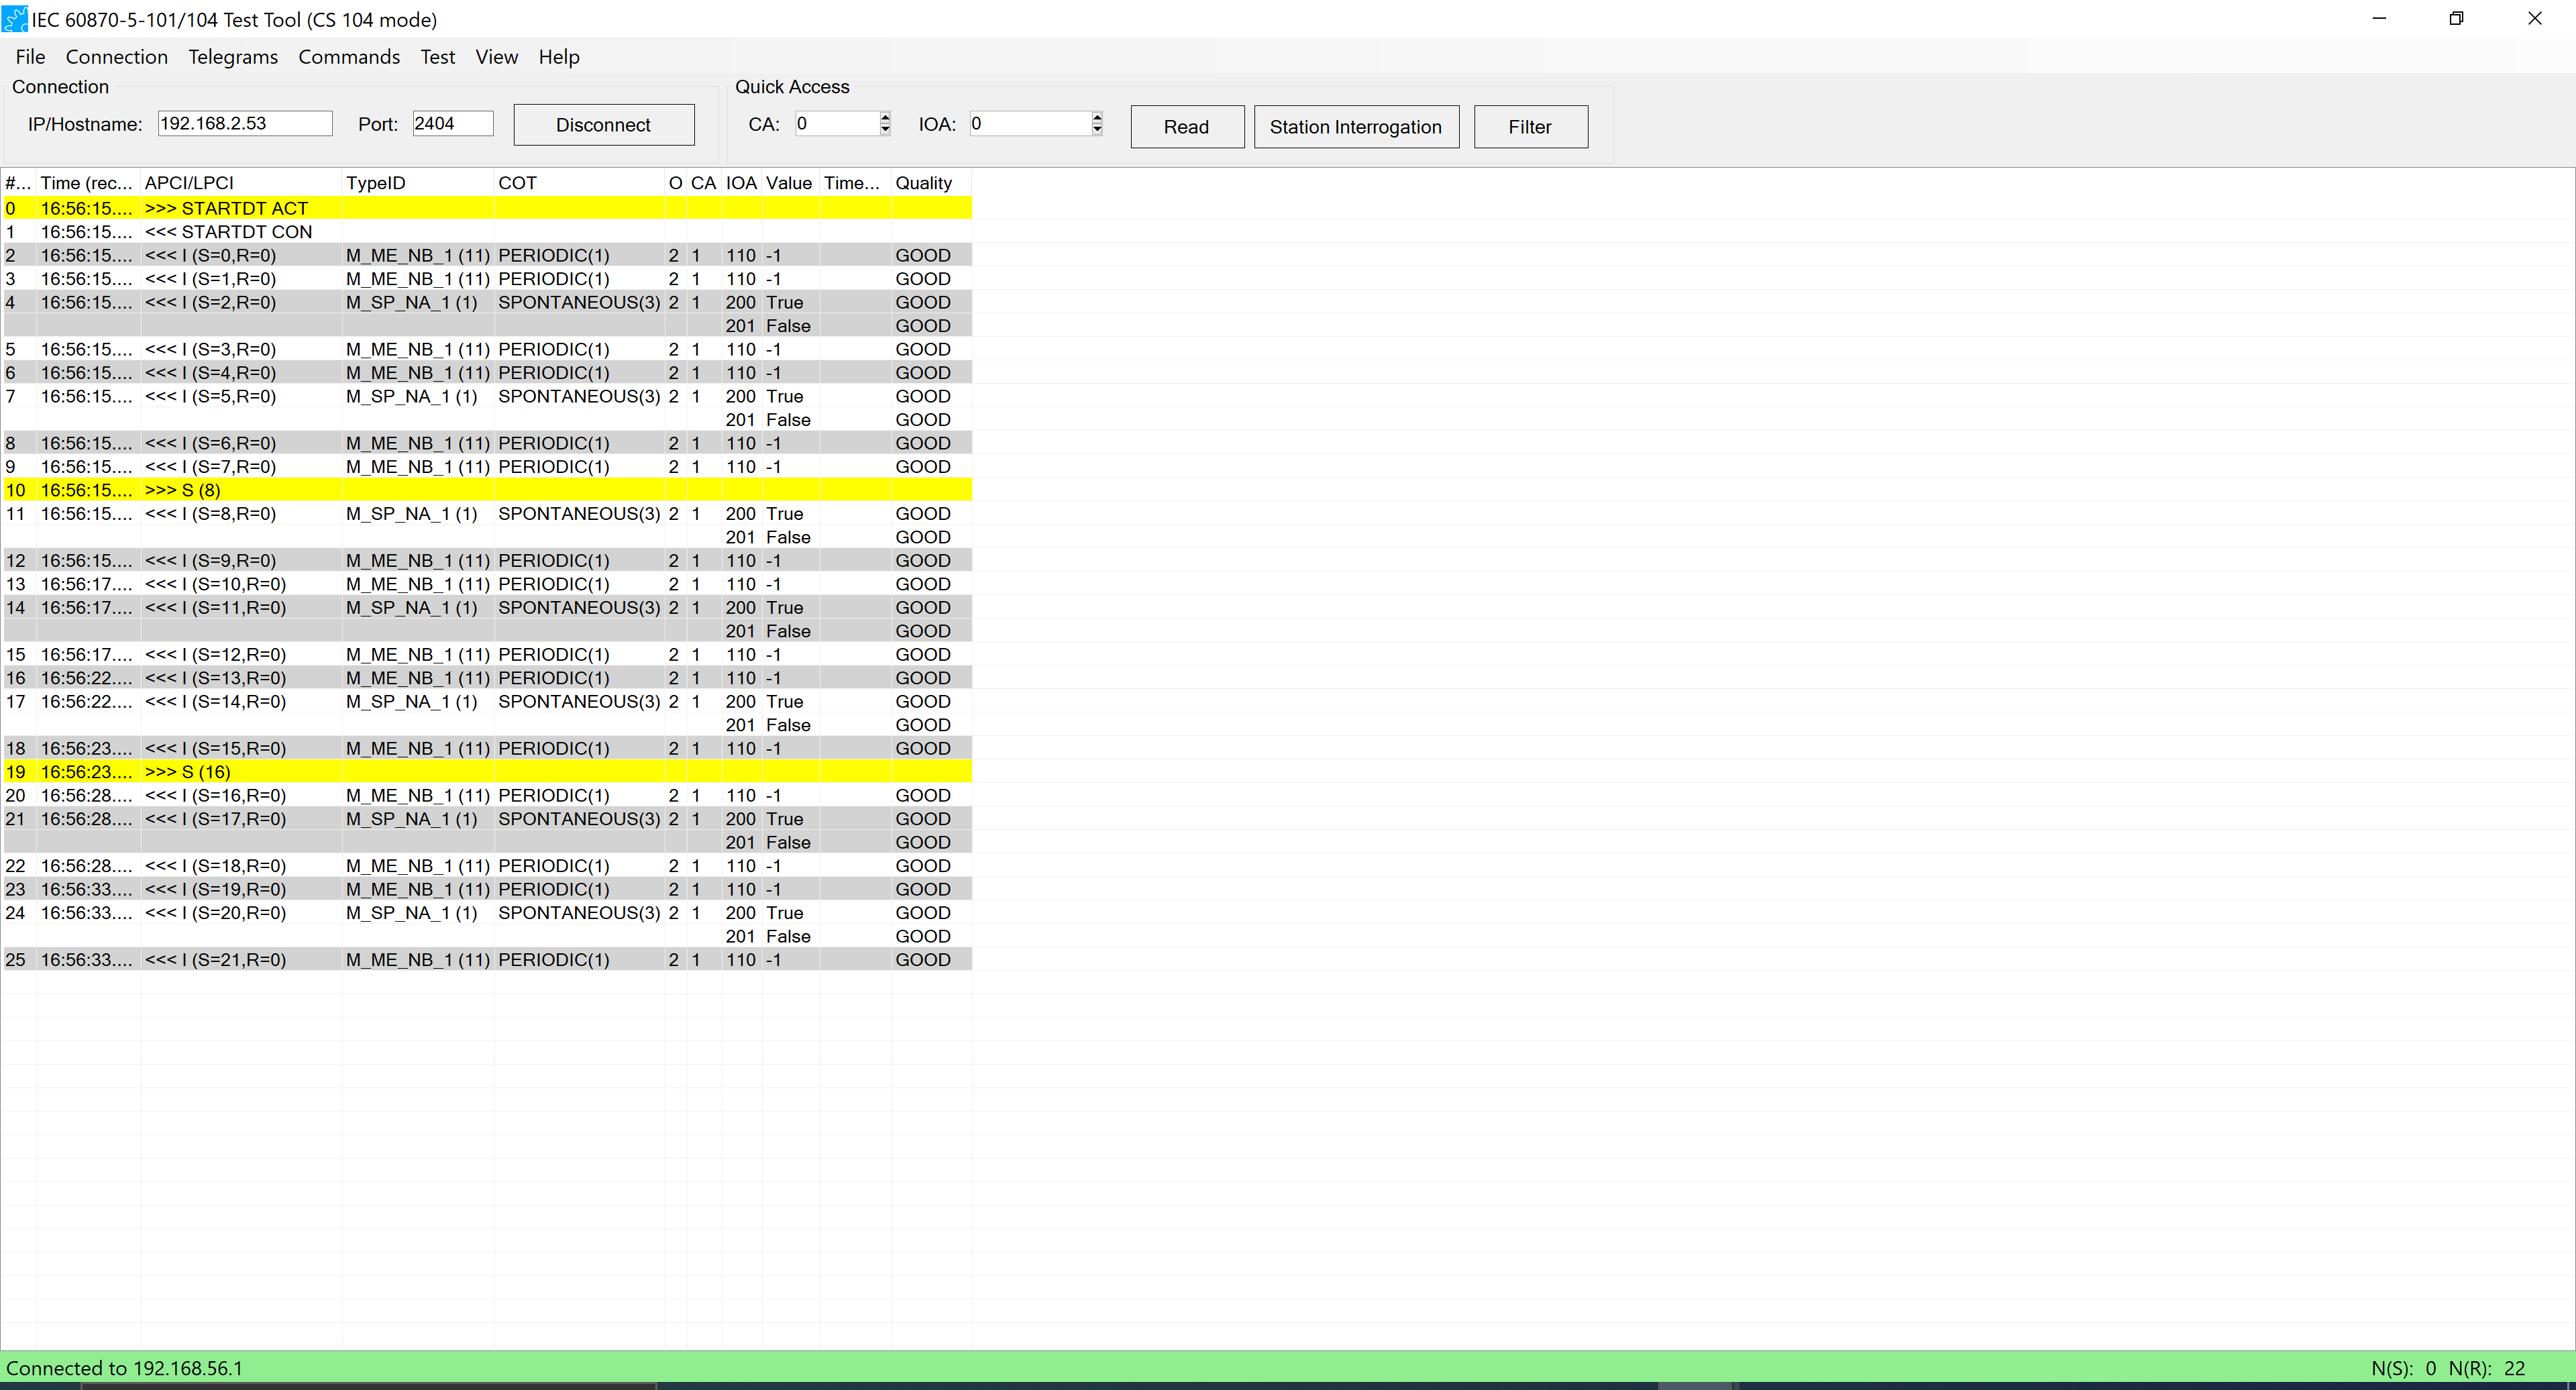
2.1. The main telegram list
When right-clicking on a telegram a context menu will open that allows to copy the message bytes to the clipboard. You can chose between different formats.
2.2. The Menu Bar
2.2.1. The File menu
In the file menu you can load and save settings to files. By default the current settings are stored in the registry and restored after restarting the application. But in case you are working on different test setups it may be useful to store particular settings in separate files.
2.2.2. The Connection menu
The connection menu can be used to configure and start/stop a connection. For the CS 104 mode there are some additional options for connection handling.
You can also find menu entries to start file uploads and downloads to the device.
2.2.3. The Telegrams menu
The Telegrams menu provides options to record, load, save, and display the telegrams.
2.2.4. The Commands menu
The Command menu contains options to send any kind of command or process data to the device.
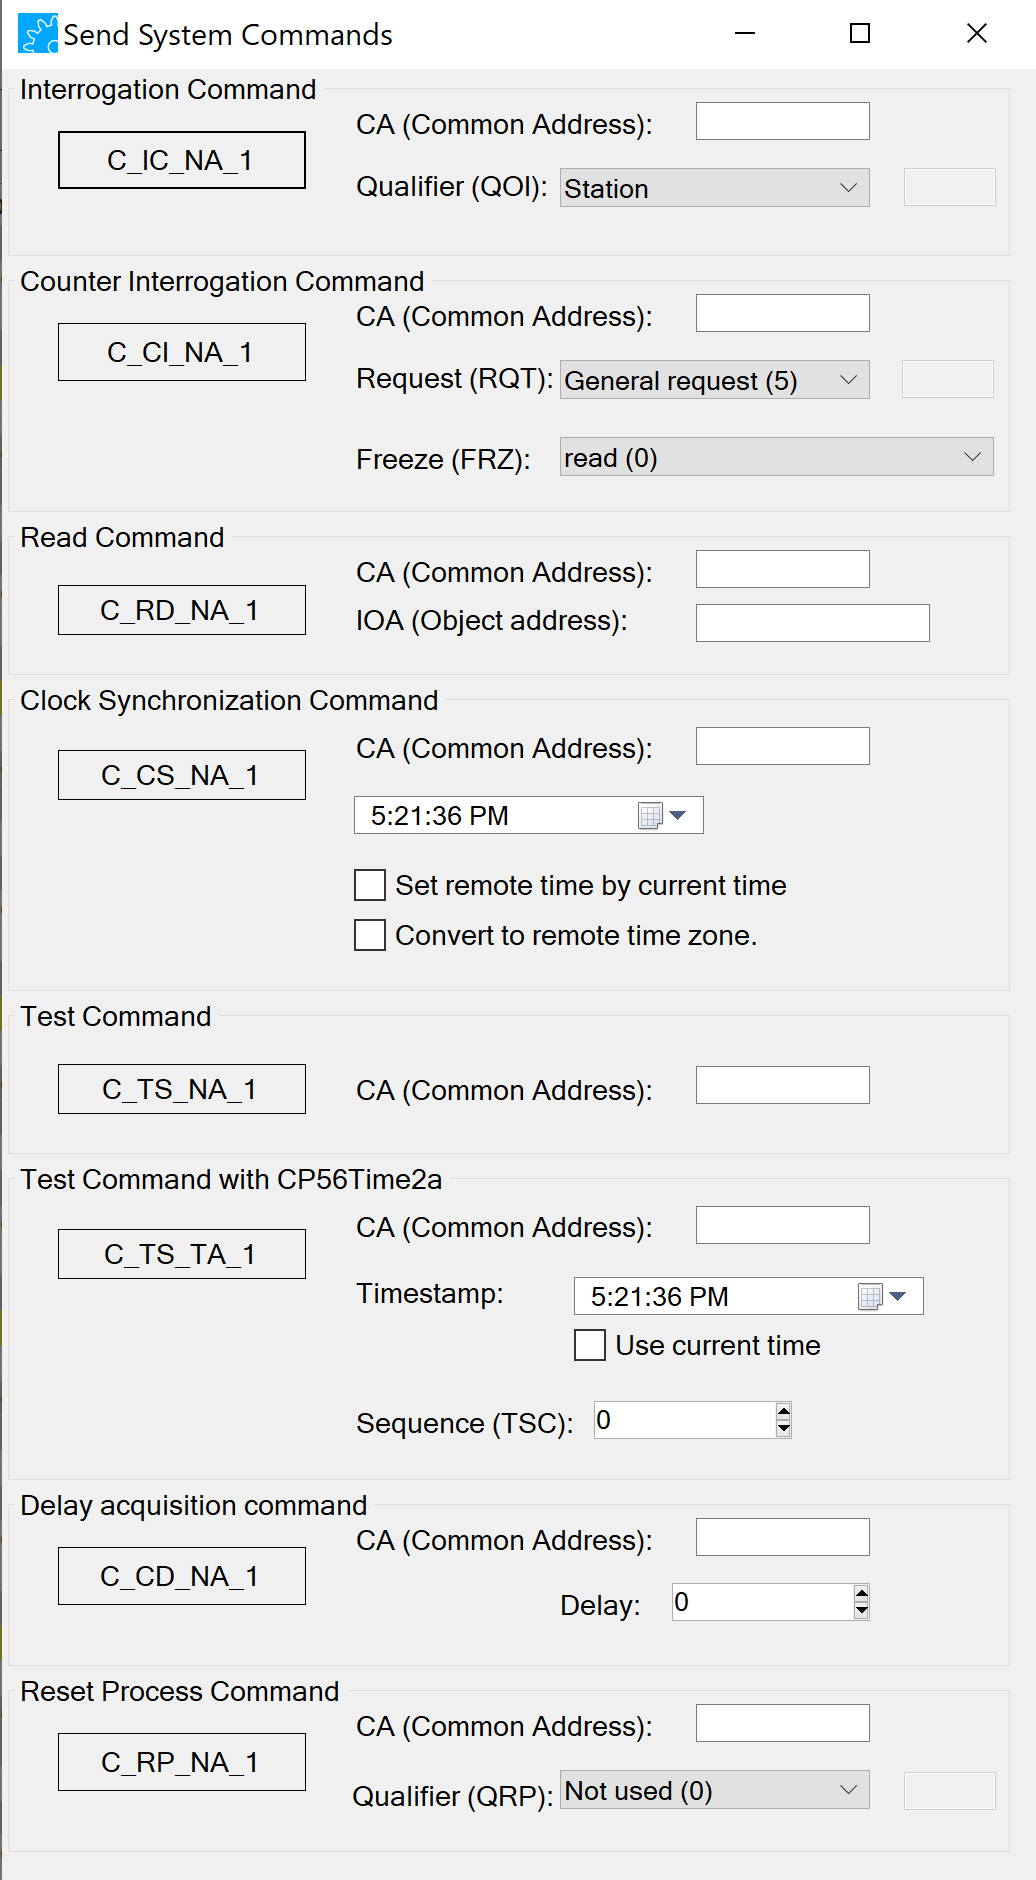
System
Send a system command (e.g. interrogation request, or read request)
Process
Send a command the influences the process (e.g. single point command or set point).
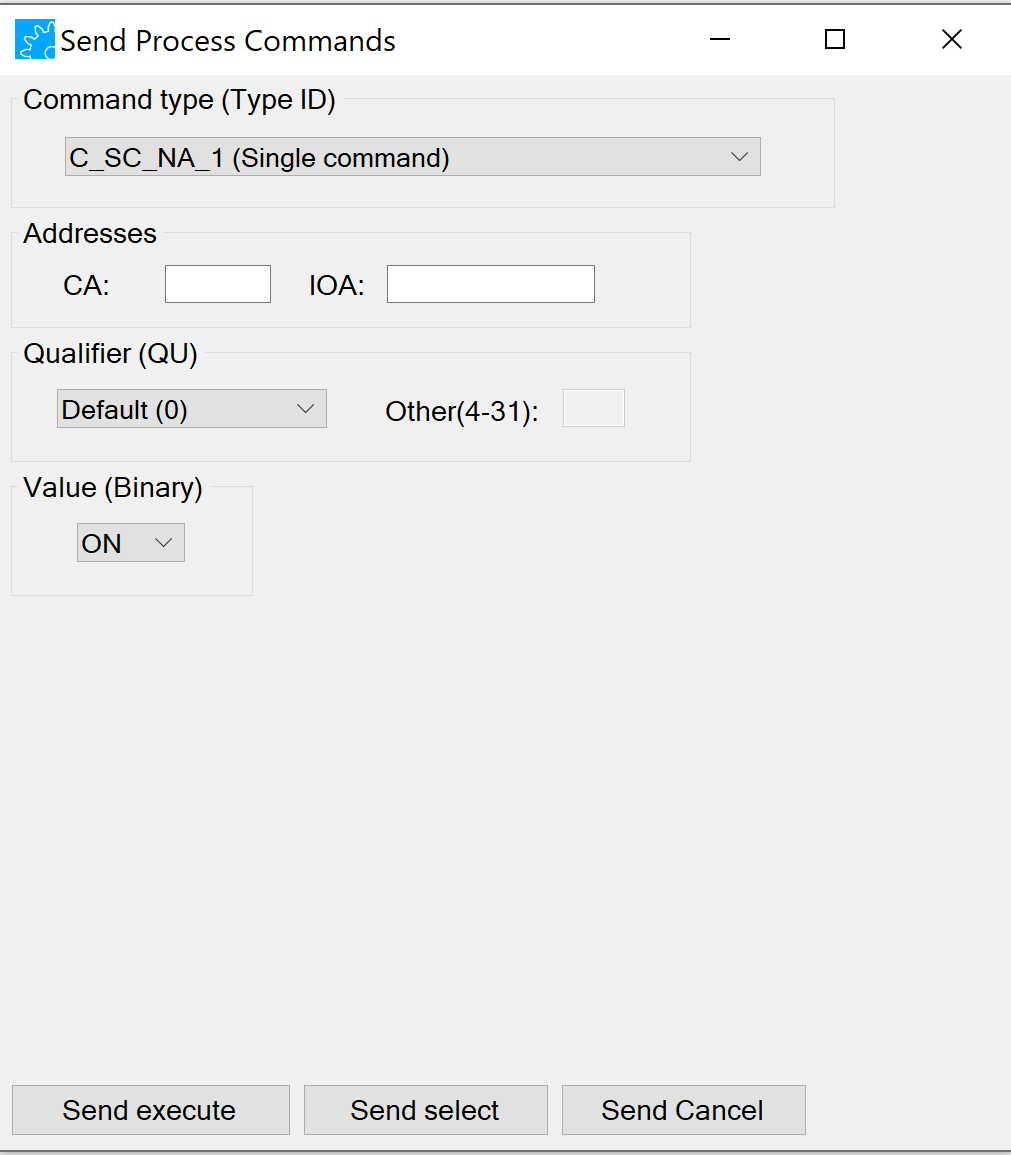
First you have to enter the command parameters. These parameters vary depending on the command type. For all commands you have to set the CA (Common Address) and the IOA (Information Object Address).
Then you can send the command by pressing the "Send execute" button. When the command is configured for Select-Before-Execute you have to send a "select" message before you can send the "execute" message.
Parameters
Send parameter in control direction.
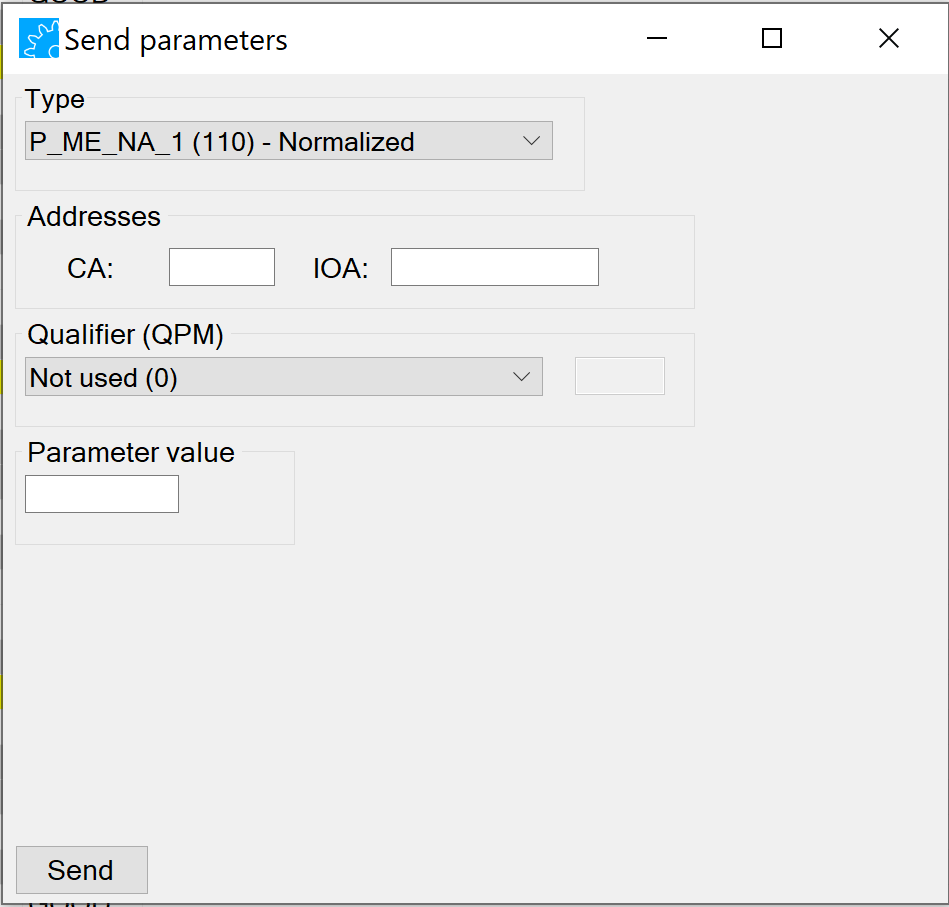
Parameter of measured value, normalized value - P_ME_NA_1 (110) Parameter of measured value, scaled value - P_ME_NB_1 (111) Parameter of measured value, short floating point value - P_ME_NC_1 (112) Parameter activation - P_AC_NA_1 (113)
Monitoring (Reverse)
This can be used to send a monitoring message (measurement value, event) in reverse direction.
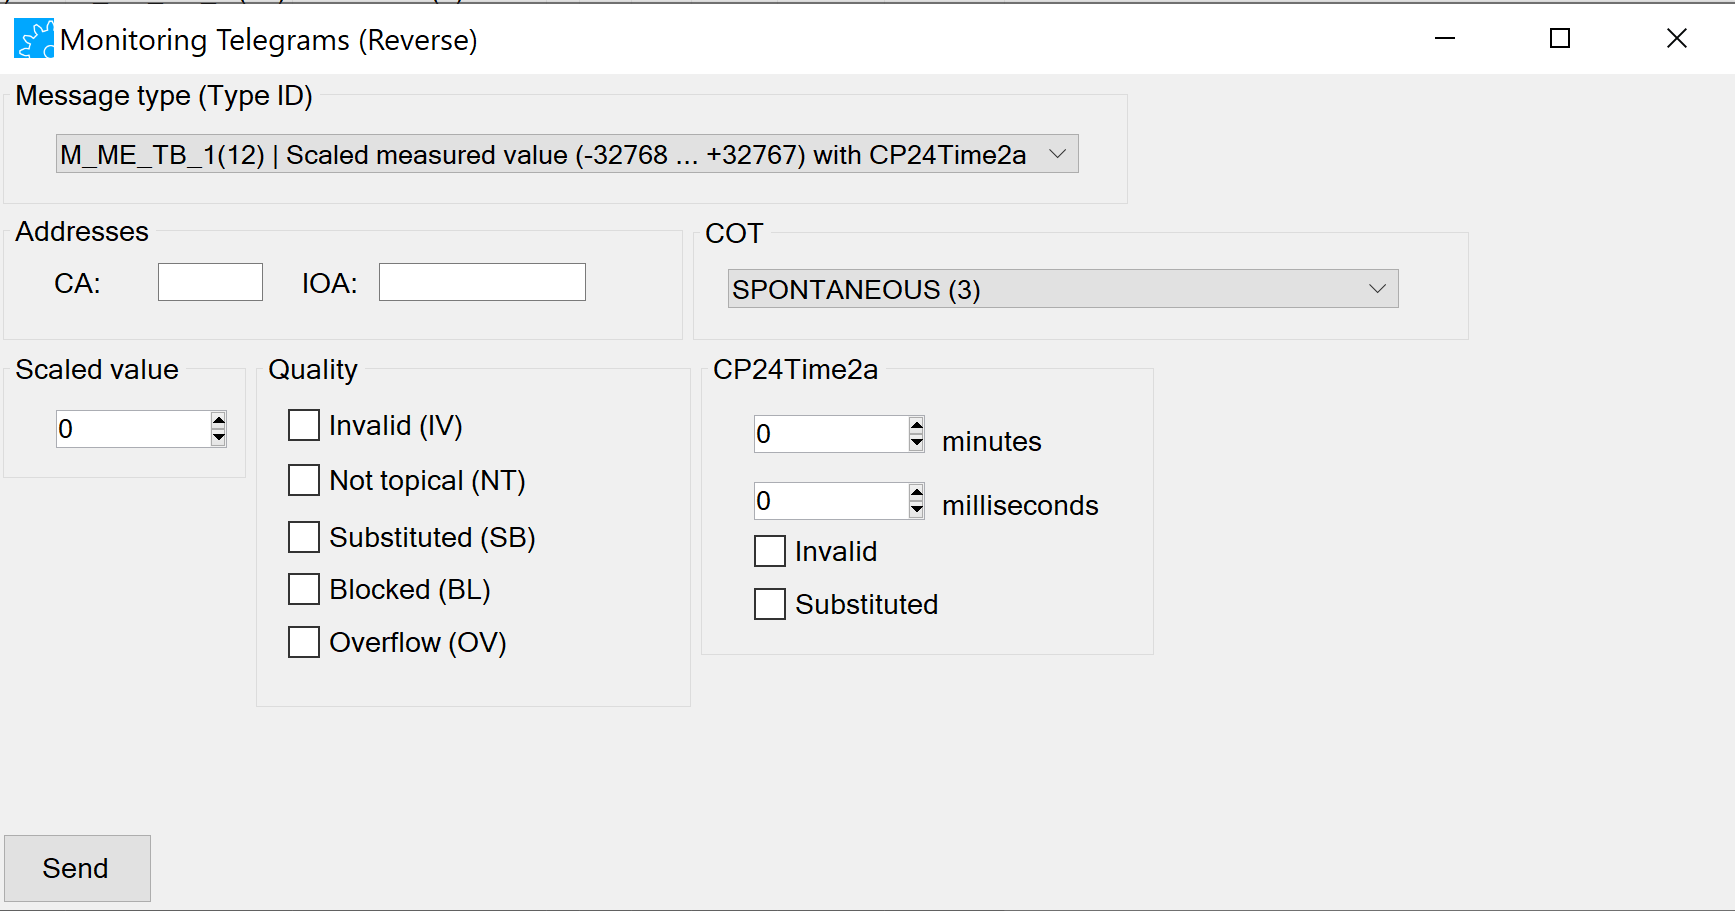
You have to select the CA(Common Address) and the IOA (Information Object Address). You can also select a specific COT (Cause of Transmission) that is used for the telegram.
When all parameters are set the message can be sent by pressing the "Send" button.
New Type
This can be used to create a user defined type description.

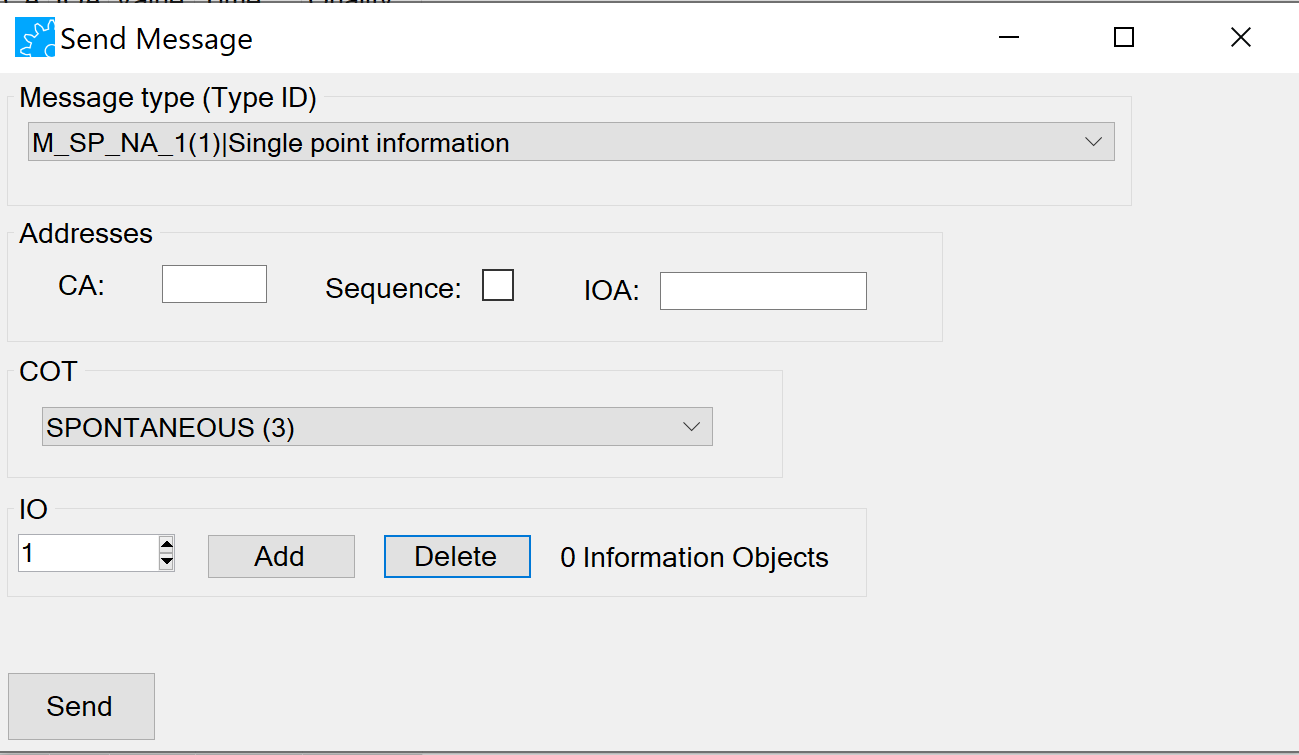
Send Message
This can be used to send standard message and commands as well as user defined types.
Python Script
This can be used to run python scripts.
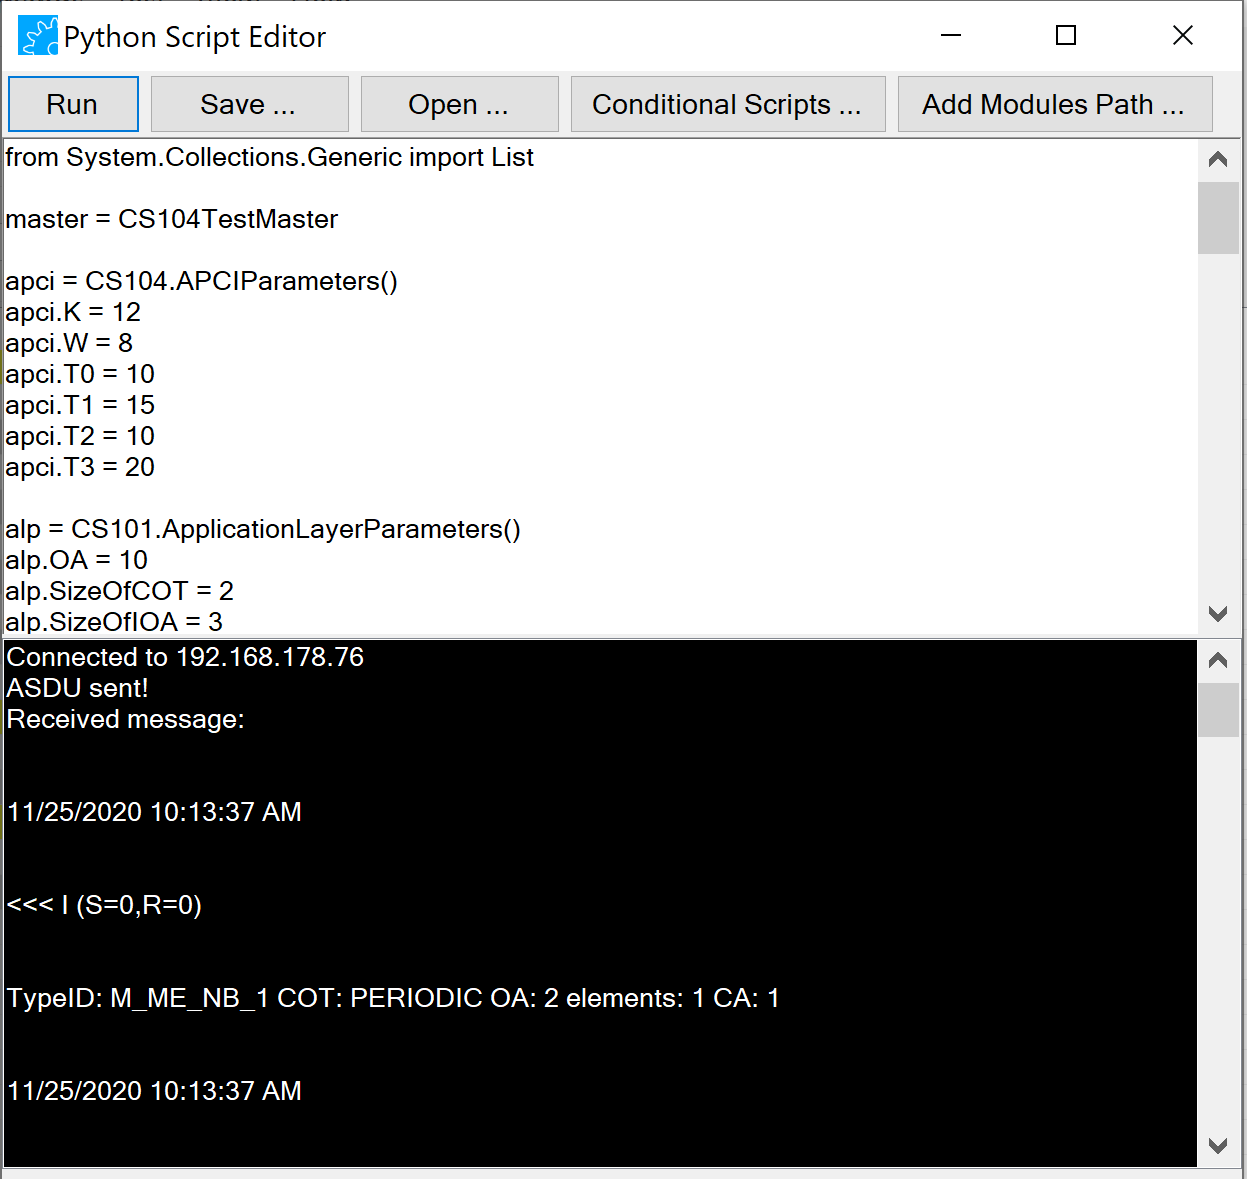
It is also possible to save, open, set running the script and add module path. Set running make possible to run automatically when connect or disconnect the tool.
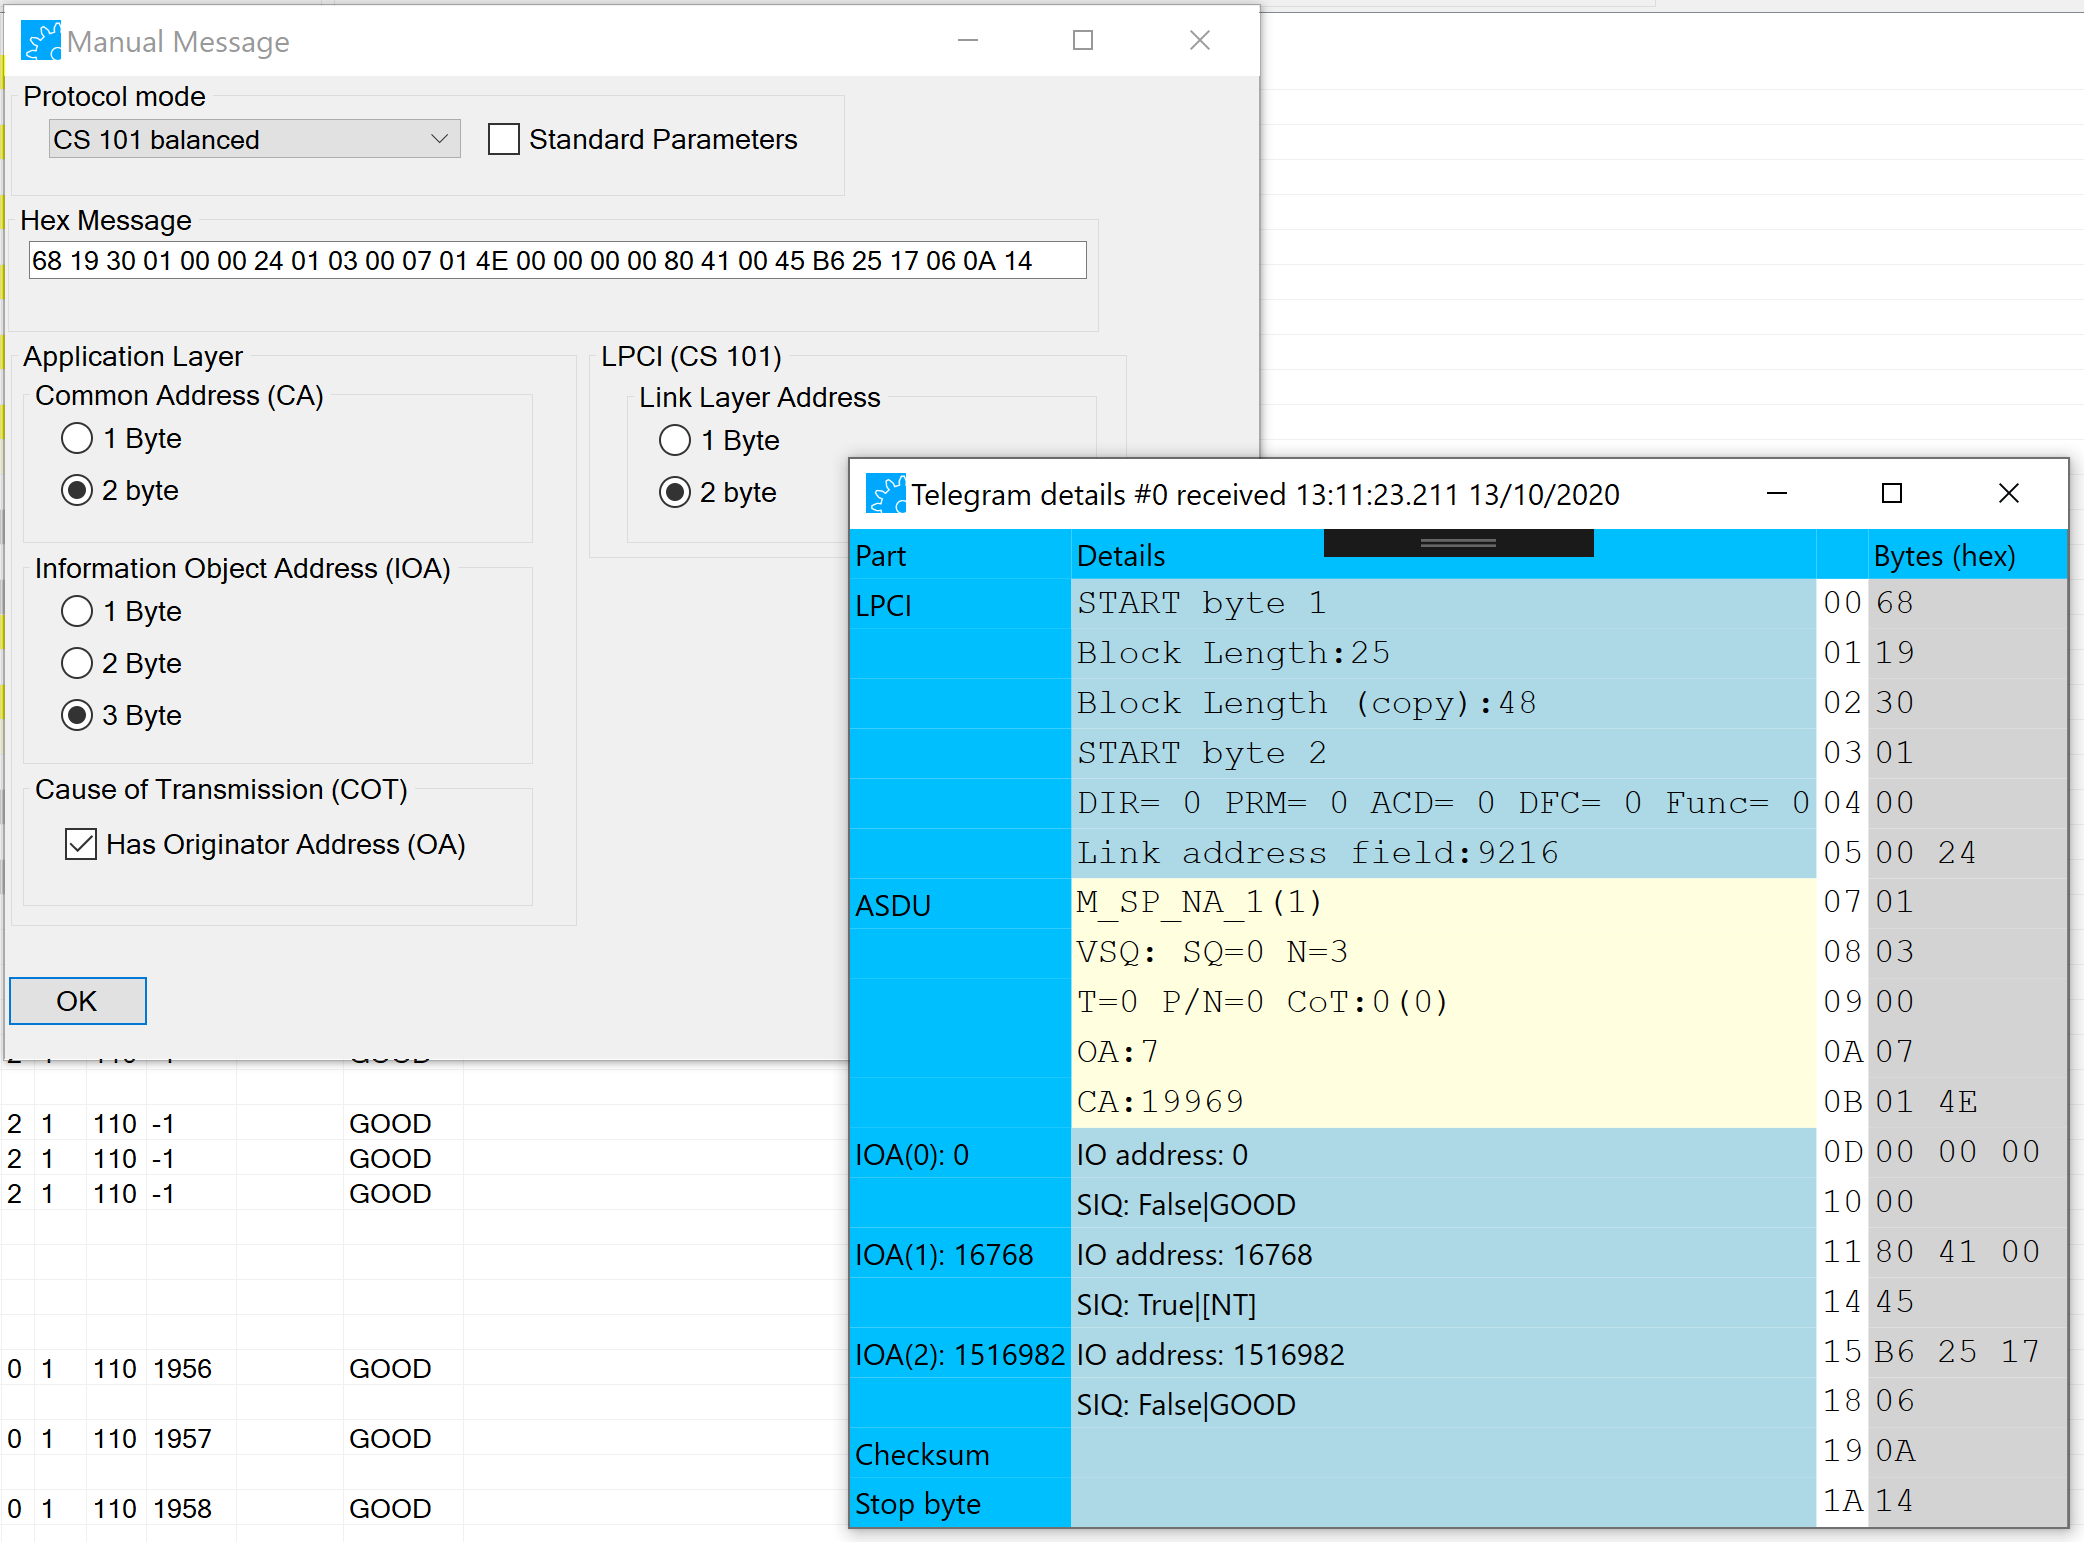
Manual Message
This can be used to enter hexadecimal information, set parameters and see the message details.
3. The Information Object Viewer
The Information Object Viewer is a separate window that show the latest state (with value, timestamp, and quality) of all received information objects in a table.
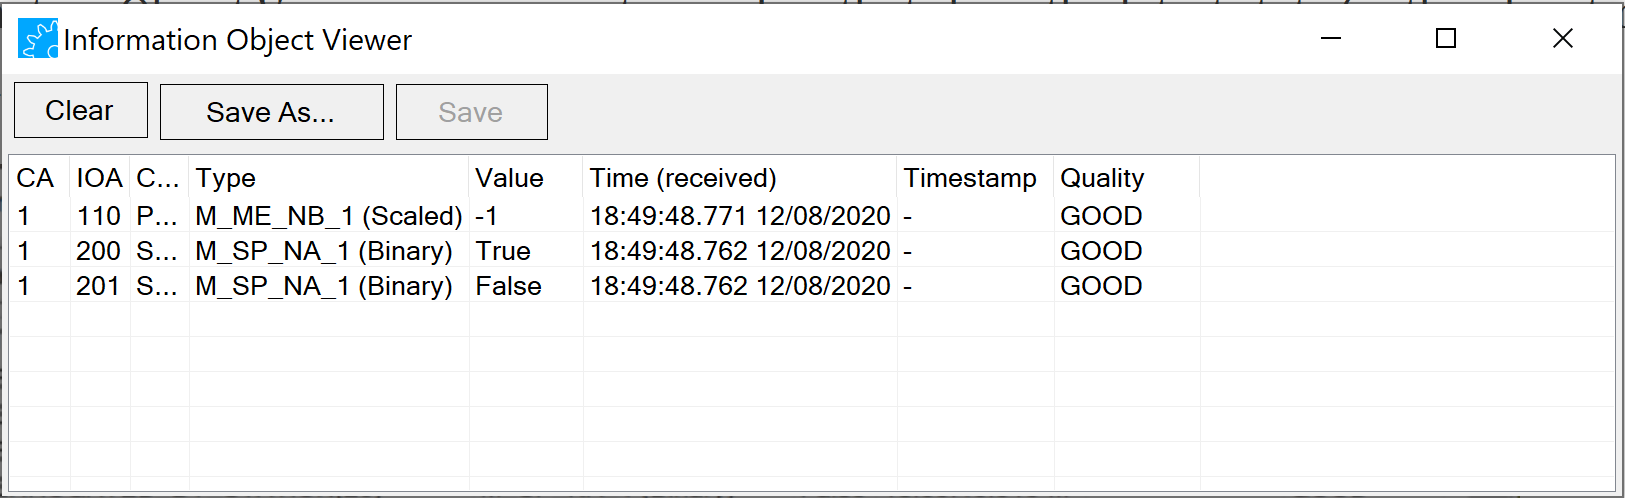
It is also possible to save the table as Excel or CSV file by pressing the "Save" or "Save as…" button.
4. The Raw Message Window
The raw message window shows the original message bytes together with some meta information.
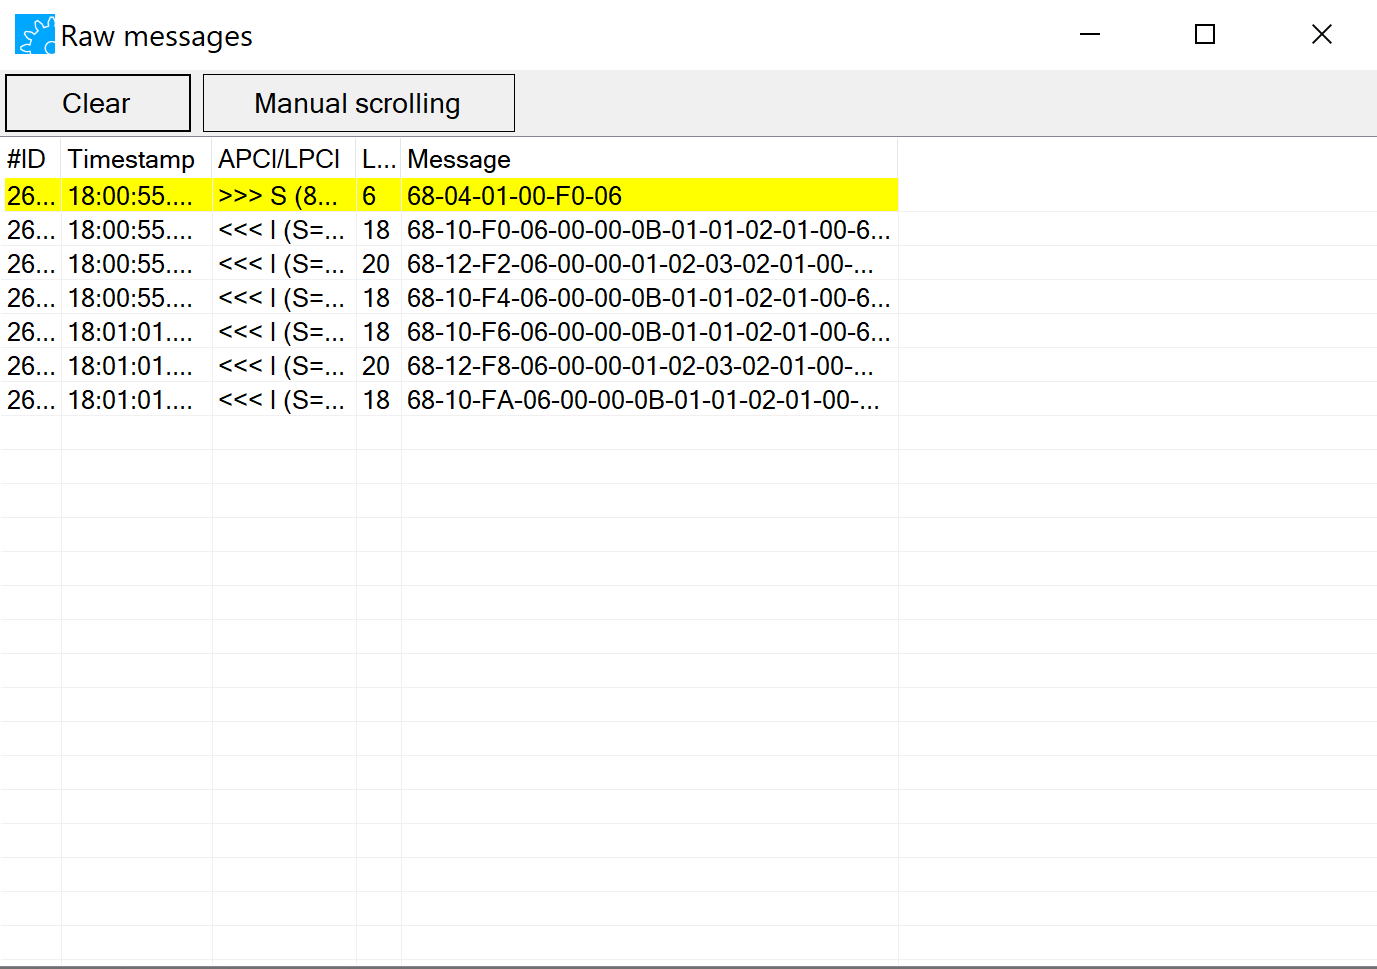
By double-clicking on a telegram you can open the "Telegram Detail Window" showing the telegram details.
5. The Telegram Detail Window
You can open the telegram detail window by right-clicking a telegram in the main window or in the raw message window. The telegram detail window shows all telegram details for the different protocol layers aside with the corresponding message bytes. You can open multiple telegram detail windows to visually compare different telegrams.
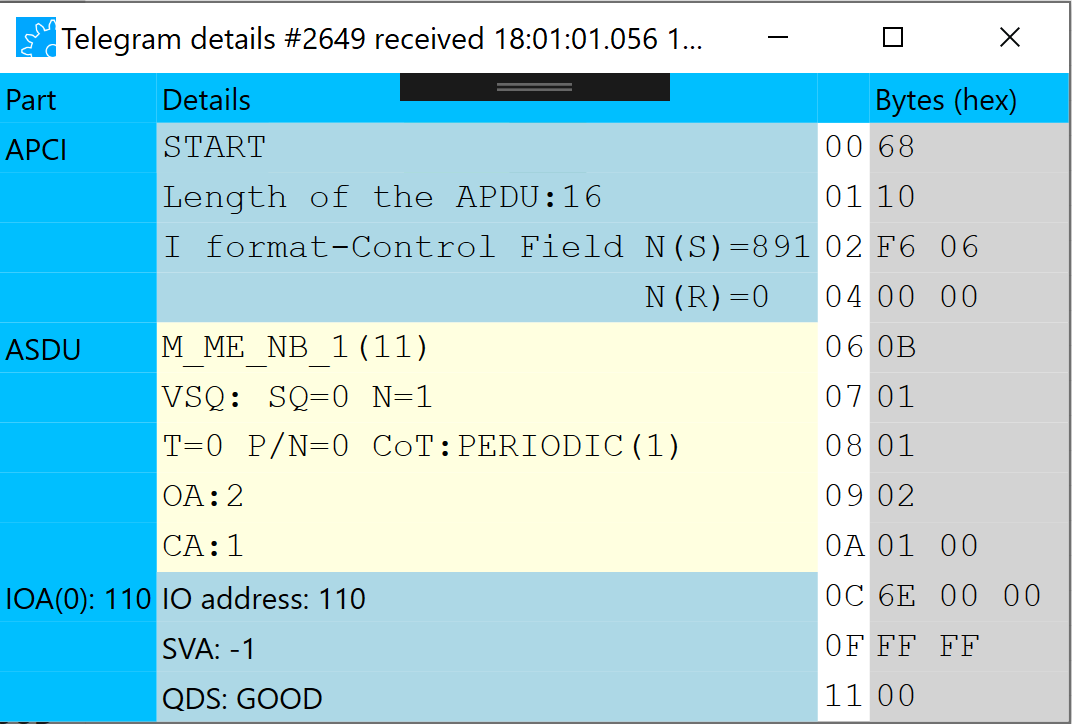
On the left side you can find the different parts (layers) of the telegram (e.g. APCI, or link layer, ASDU, or information objects). Next there is the "Details" column, showing details of particular message parts. Every row in the "Details" correspond to a specific message element. The raw bytes of these elements can be seen in the right-most column as hexadecimal bytes. The white column in between is the starting address of the element.
6. Python Scripting Interface (Advanced Test Edition Only)
The test tool provides a Python scripting interface to automate your tests. The scripting interface can be used from the "Script Window" as well as from the command line.
Using the scripting interface it is possible to write and run scripts with access to .NET libraries, Python libraries, the test application functions, as well as the lib60870.NET library for IEC 60870-5-101 and IEC 60870-5-104 protocols.
Python Objects
The default scope of the Python script contains a list of four objects to access the automation API of the test tool.
The following section describes these objects and its methods:
IOFactory
This object is used to create new information objects and to set the values of the information object elements.
ShowIOTypes()
ShowMessageElements (string name)
CreateElement(string type, object value)
CreateElement(string type, object value1, object value2)
CreateElement(string type, object value1, object value2, object value3)
CreateElement(string type, object value1, object value2, object value3, object value4)
CreateIO(string type, int ioa, List<InformationElement> elements)
CS104TestMaster
This object represents the default CS 104 master.
Connect(string hostname, int tcpPort)
Disconnect()
DiscardMessageBuffer()
SaveMessageBuffer(string filename)
MessageBufferSize()
MessageBufferGetRawMessage(int index)
MessageBufferGetParsedMessage(int index)
GetIODetails(ASDU asdu, int ioIndex)
SetAPCIParameters(APCIParameters apciParameters)
GetAPCIParameters()
UseLocalNetworkInterface(bool useLNI)
SetLocalNetworkInterface(string ip, int localPort)
UseTLSConfiguration(bool useTls)
SetTLS(string clientIdentityFilename, string keyCertFilename, bool allowOnlySpecificCertificate, bool validateCaCertificate, string serverCaFilename, string serverCertFilename)
SetApplicationLayerParameters(ApplicationLayerParameters applicationLayerParameters)
GetApplicationLayerParameters()
SendASDU(ASDU newAsdu)
WaitForNextMessage(int time,List<string>  type)
WaitForNextMessage(int time)
WaitForMessages(int time, List<string> type)
WaitForMessages(int time)
WaitForAsdus(int time)
WaitForAsdus(int time, List<string> type, List<int> cot_)
WaitForNextAsdu(int time)
WaitForNextAsdu(int time, List<string> type, List<int> cot_)
StartDtAct ()
SendStartDT()
StopDtAct()
StopDtCon()
TestFrAct()
TestFrCon()
CS101TestMaster
This object represents the default CS 101 master.
Connect()
Disconnect()
AddSlave(int defSlaveAddr)
UseSlaveAddress(int defSlaveAddr)
DiscardMessageBuffer()
SaveMessageBuffer(string filename)
MessageBufferSize()
MessageBufferGetRawMessage(int index)
MessageBufferGetParsedMessage(int index)
GetIODetails(ASDU asdu, int ioIndex)
SetLPCIParameters (LPCIParameters LPCIParameters)
GetLPCIParameters()
UseLocalNetworkInterface(bool useLNI)
SetLocalNetworkInterface(string ip, int localPort)
UseTLSConfiguration(bool useTls)
SetTLS(string clientIdentityFilename, string keyCertFilename, bool allowOnlySpecificCertificate, bool validateCaCertificate, string serverCaFilename, string serverCertFilename)
SetSerialParameters (SerialParameters serialParameters)
SetApplicationLayerParameters (ApplicationLayerParameters applicationLayerParameters)
GetApplicationLayerParameters
SetMode(ProtocolMode mode)
WaitForNextMessage(int time)
WaitForMessages(int time)
WaitForAsdus(int time)
WaitForAsdus(int time, List<string> type, List<int> cot_)
WaitForNextAsdu(int time)
WaitForNextAsdu(int time, List<string> type, List<int> cot_)
TestLink()
RequestClass1Data()
RequestClass2Data()
SendASDU(ASDU newAsdu)
Examples and usage
The following example connects to CS104 Mode through CS104TestMaster shared variable which has access to the Tool Application Core. After the parameters are set and the connection is applied, an ASDU is created to be sent using the CS104TestMaster variable.
After the Asdu is sent, the script waits 500 ms to receive a list of messages and print its information.
ScripExampleCS104.py
from System.Collections.Generic import List

master = CS104TestMaster

# Create and set APCI parameters and ApplicationLayer parameters

apci = CS104.APCIParameters()
apci.K = 12
apci.W = 8
apci.T0 = 10
apci.T1 = 15
apci.T2 = 10
apci.T3 = 20

alp = CS101.ApplicationLayerParameters()
alp.OA = 10
alp.SizeOfCOT = 2
alp.SizeOfIOA = 3
alp.SizeOfCA = 2

master.SetApplicationLayerParameters(alp)
master.SetAPCIParameters(apci)

#Connect to host 192.168.178.76 on port 2404

master.Connect("192.168.178.76",2404)

#Exit code that can be checked after run script from command line

exitCode = ExitCode.UnknownError
master.SetExitCode(exitCode)

#Create single point information object with timestamp

quality = CS101.QualityDescriptor()
quality.Blocked = True;
quality.Invalid = True;
quality.NonTopical = True;
quality.Substituted = True;
quality.Overflow = False;

time = CP24Time2a()
time.Millisecond = 2
time.Second = 3
time.Minute = 5
time.Invalid = True
time.Substitued = False

#List of information elements

InfoElementsList = List[InformationElement]()

valueSIQ = ElementValue()
valueSIQ.boolValue = True
valueSIQ.qualitySIQValue = quality

#InformationElement(string type, ElementValue value, int size, byte[] byteValue)
element1 = InformationElement("SIQ" ,valueSIQ, 1, None)

valueTime = ElementValue()
valueTime .cp24Time2aValue= time

#InformationElement(string type, ElementValue value, int size, byte[] byteValue)
element2 = InformationElement("CP24Time2a" ,valueTime , 3, None)

InfoElementsList .Add(element1)
InfoElementsList .Add(element2)

typeId = CS101.TypeID.M_SP_TA_1

#UserDefinedType((TypeID)typeDescription.TypeID, ioa, InformationElementsList)
io = UserDefinedType(typeId, 101, InfoElementsList)

#Create ASDU
alp = CS104TestMaster.GetApplicationLayerParameters()

asdu = CS101.ASDU(alp, CS101.CauseOfTransmission.ACTIVATION, False, False, alp.OA, 1, False)

#Add IO do ASDU
asdu.AddInformationObject(io)

#Send ASDU
CS104TestMaster.SendASDU(asdu)

#The following code wait 500ms and print messages received as well as ASDU

list = List[str]()
list.Add("I")

messageList = master.WaitForMessages(5000,list)

print("Received message:")

for message in messageList :
  print(message.RawMessage.Timestamp)
  if(message.Apci!= None):
     print(message.Apci);
  if(message.Asdu != None):
      print(message.Asdu);

asduList=master.WaitForAsdus(5000)

for i in asduList:
  print(i)

master.Disconnect()
The next example connects to CS101 Balanced Mode through CS101TestMaster shared variable, waits 500ms to receive a list of Asdus, send ASDU with M_SP_TA and disconnects.
This example uses the IOFactory shared variable to create InformationElement and the Information Object it self.
ScripExampleCS101.py
from System.Collections.Generic import List

#Set LPCI, Serial and Application layer parameters as well as the protocol mode

lpci = LPCIParameters()
lpci.PollInterval = 500
lpci.SetDirBit = True
lpci.DefaultSlaveAddress = 1
lpci.OwnAddress = 3
lpci.AutomaticPoll = False
lpci.LlAddressSize = 2

serial = SerialParameters()
serial.BaudRate = 9600
serial.Parity = "E"
serial.DeviceName = "COM9"

alp = CS101.ApplicationLayerParameters()
alp.OA = 10
alp.SizeOfCOT = 2
alp.SizeOfIOA = 3
alp.SizeOfCA = 2

mode = ProtocolMode.CS101_BALANCED

master=CS101TestMaster
master.SetLPCIParameters(lpci)
master.SetSerialParameters(serial)
master.SetMode(mode)
master.SetApplicationLayerParameters(alp)

#Connect after set the parameters
master.Connect()

#Wait and print the information of messages received in a interval of 5000ms
messageList = master.WaitForMessages(5000)

print("Received message:")

for message in messageList :
  print(message.RawMessage.Timestamp)
  if(message.Apci!= None):
     print(message.Apci);
  if(message.Asdu != None):
      print(message.Asdu);

#Wait and print the information of ASDUs received in a interval of 5000ms
asduList=master.WaitForAsdus(5000)

for i in asduList:
  print(i)

#Create single information object with timestamp, add to ASDU and send it

quality = CS101.QualityDescriptor()
quality.Blocked = True;
quality.Invalid = True;
quality.NonTopical = True;
quality.Substituted = True;
quality.Overflow = False;

time = CP24Time2a()
time.Millisecond = 2
time.Second = 3
time.Minute = 5
time.Invalid = True
time.Substitued = False

InfoElementsList = List[InformationElement]()

#using IOFactory.CreateElement (type, value, value) to return InformationElement and add to InfoElementsList
InfoElementsList .Add(IOFactory.CreateElement("SIQ", True, quality))
InfoElementsList .Add(IOFactory.CreateElement("CP24Time2a",time) )

#Using IOFactory.CreateIO to create de information object
io = IOFactory.CreateIO("M_SP_TA_1", 101, InfoElementsList)

alp = CS104TestMaster.GetApplicationLayerParameters()

asdu = CS101.ASDU(alp, CS101.CauseOfTransmission.ACTIVATION, False, False, alp.OA, 1, False)

asdu.AddInformationObject(io)

master.SendASDU(asdu)

master.Disconnect()
This example shows how to use get the message buffer .
bufferMessage.py
size = CS104TestMaster.MessageBufferSize()
print("Size " + str(size))

#Get message in the position 3
rawMessage = CS104TestMaster.MessageBufferGetRawMessage(3)

print(rawMessage)

parsedMessage= CS104TestMaster.MessageBufferGetParsedMessage(3)

print(parsedMessage)

#Print rawMessage TimeStamp
print (rawMessage .Timestamp)

#Print parsedMessage Apci
if parsedMessage.Apci is not None:
  print(parsedMessage.Apci)

#Get ASDU
if parsedMessage.Asdu is not None:
  asdu = parsedMessage.Asdu
  print(asdu)
  print("Number of Elements: " + str(asdu.NumberOfElements))

  #Get all IO information from the ASDU
  for x in range(0, asdu.NumberOfElements) :
    InformationObject = asdu.GetElement(x)
    print(InformationObject)
    print("IOA(" + str(x) + "): " + str(InformationObject .ObjectAddress))

    #Get IO information details
    for info in CS104TestMaster.GetIODetails(asdu,x):
      print(info)
Python script from the command line - IEC104TestTool
The EIC104TestTool is an extension for the IEC60870TestTool used to run scripts from the command line with the same functionalities from the IEC60870TestTool.
Usability:
IEC104TestTool.exe script.py
Flags: -l before the script file name to choose the output mode between INFO, WARNING, ERROR, NONE, ALL. The standard output is WARNING.
e.g.
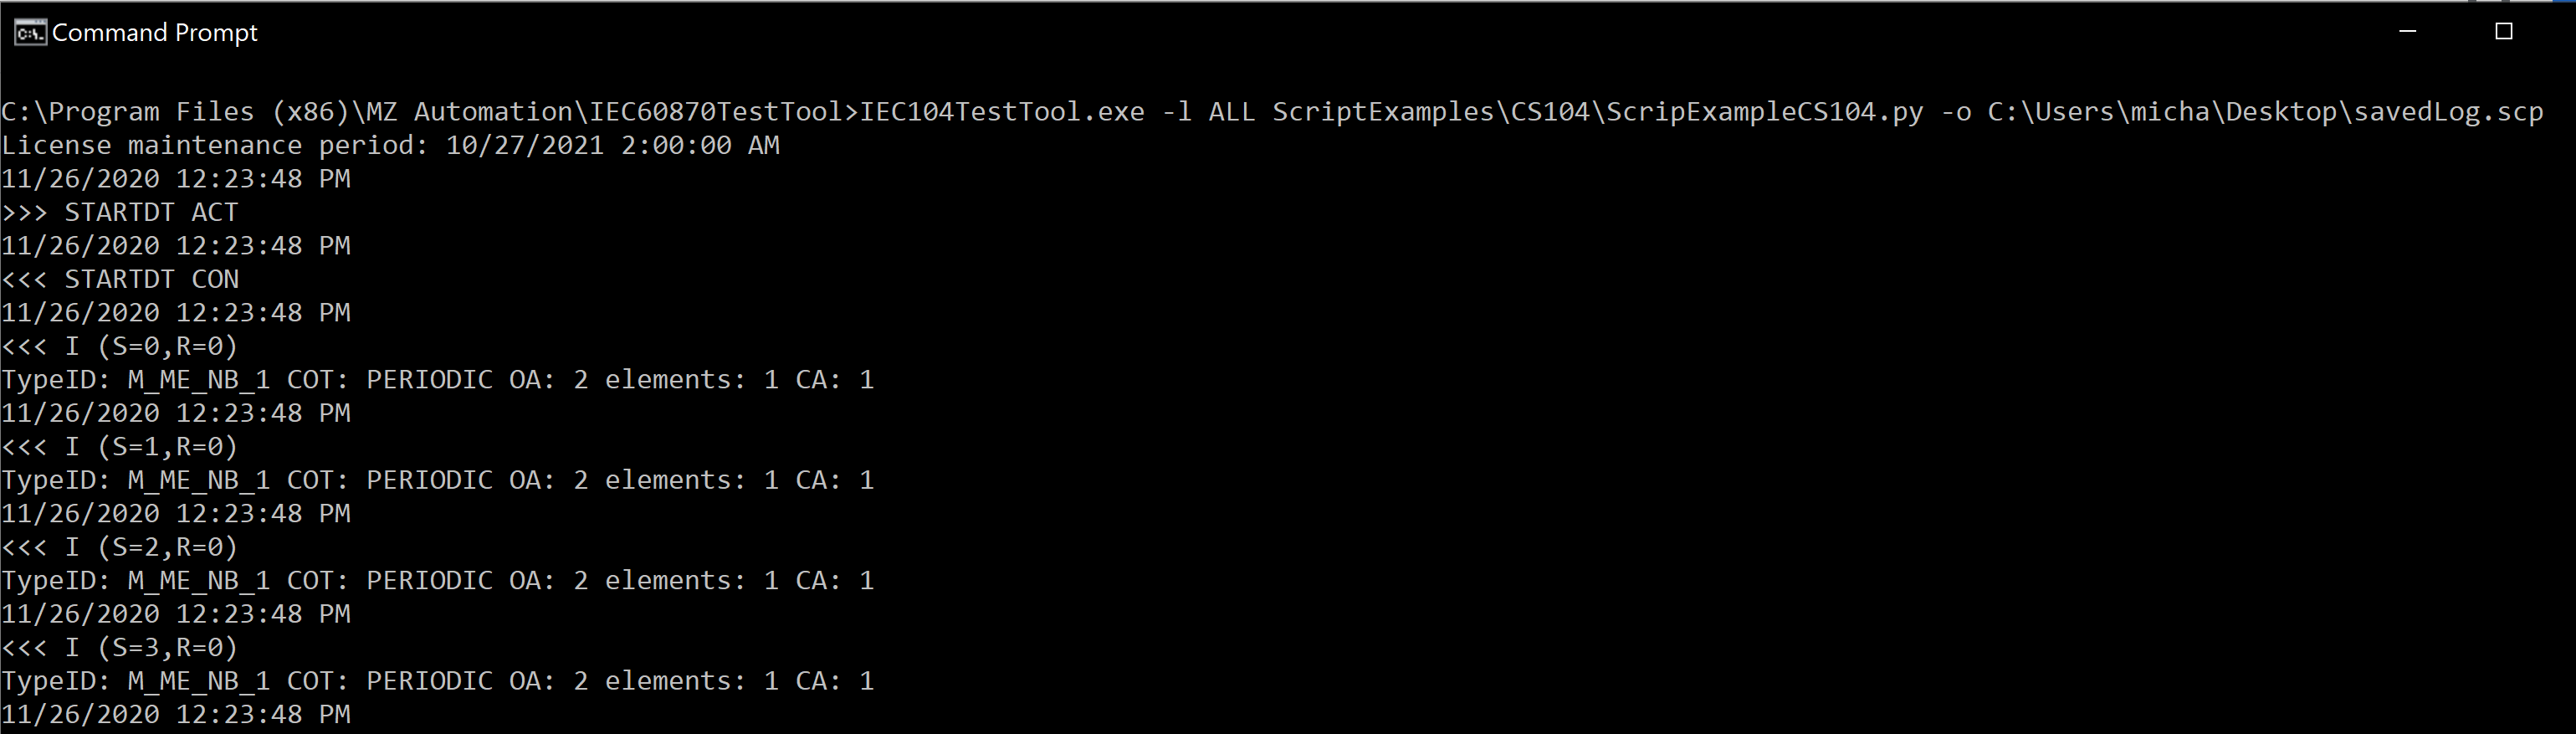
IEC104TestTool.exe -l ALL ScriptExamples\CS104\ScripExampleCS104.py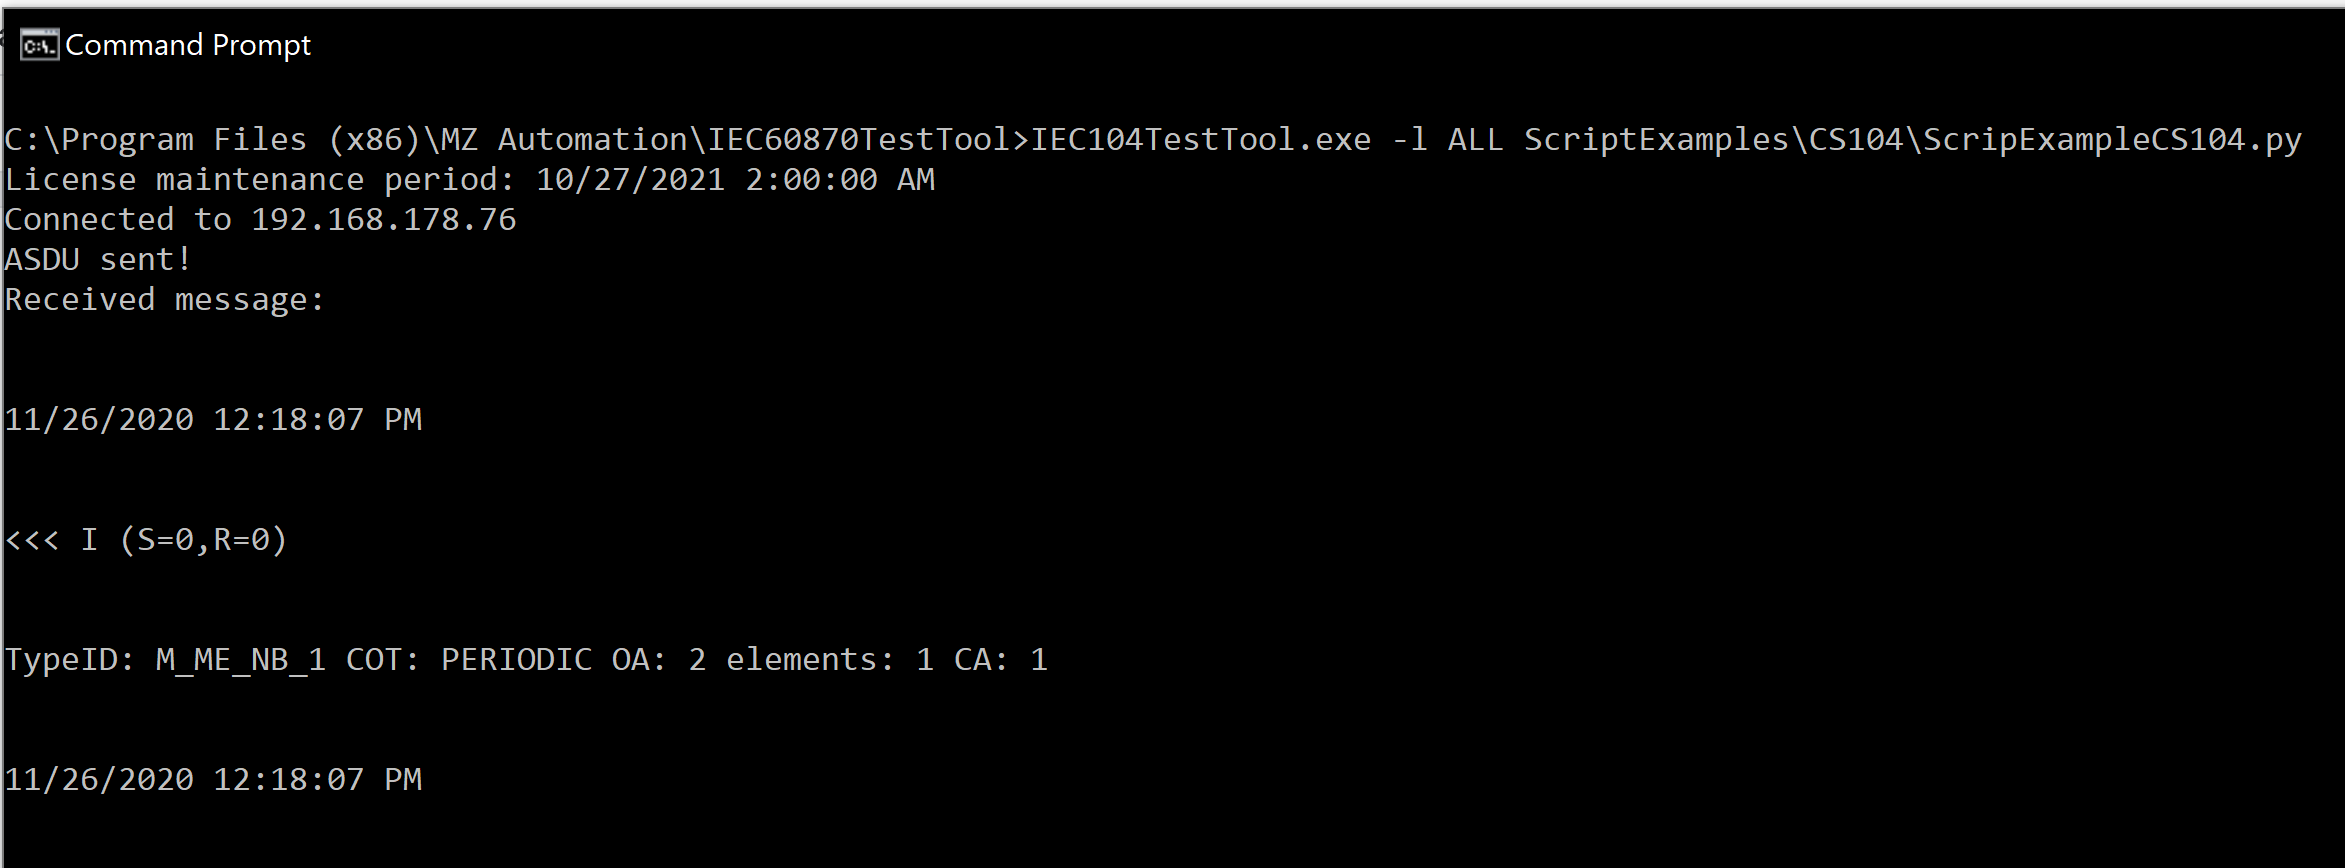
Is also possible to save and open the log messages with the flags -s or -o followed by the name of the file.
e.g.
IEC104TestTool.exe -l ALL ScriptExamples\CS104\ScripExampleCS104.py -s C:\Users\micha\Desktop\savedLog.scp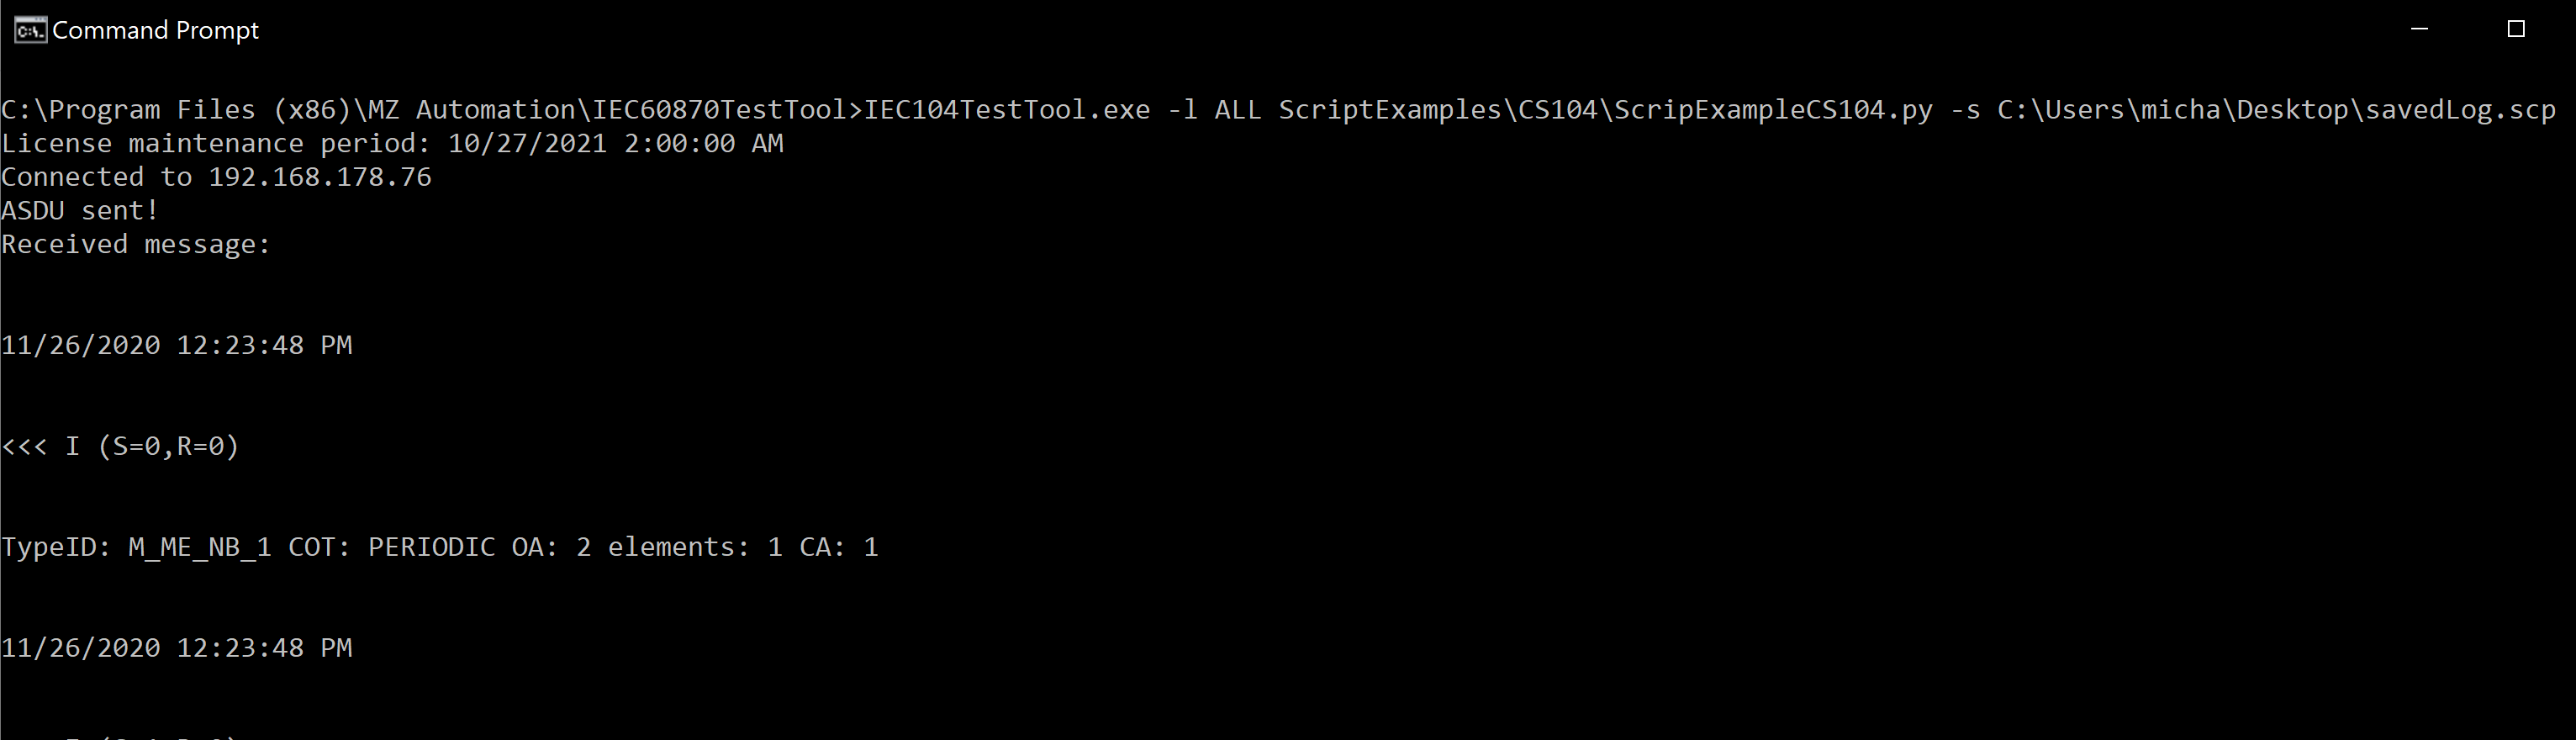
when used the open mode (-o), the messages are printed before the script is executed.
e.g.
IEC104TestTool.exe -l ALL ScriptExamples\CS104\ScripExampleCS104.py -o C:\Users\micha\Desktop\savedLog.scp